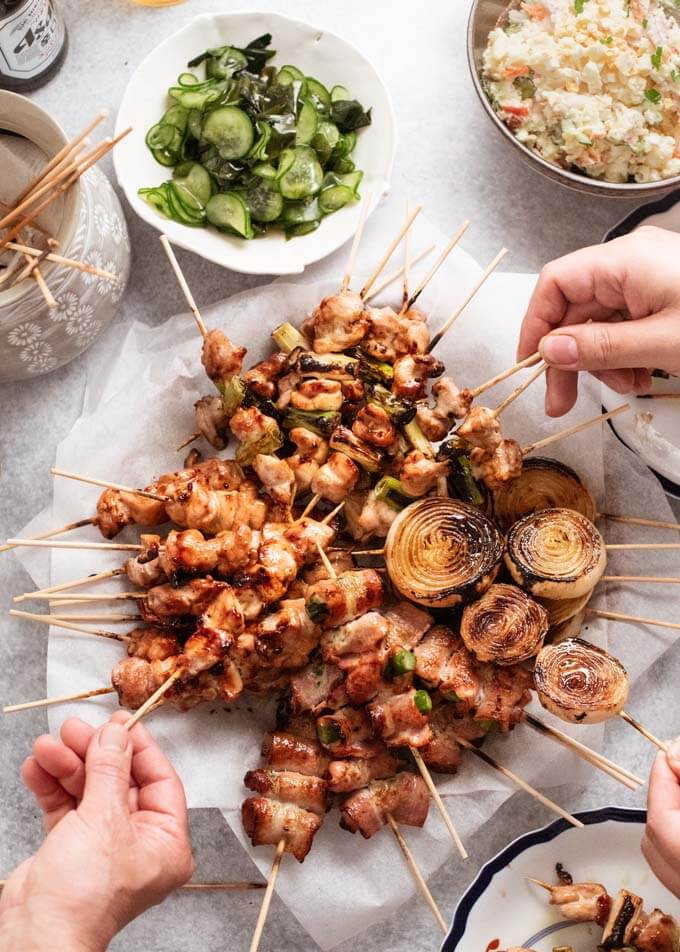
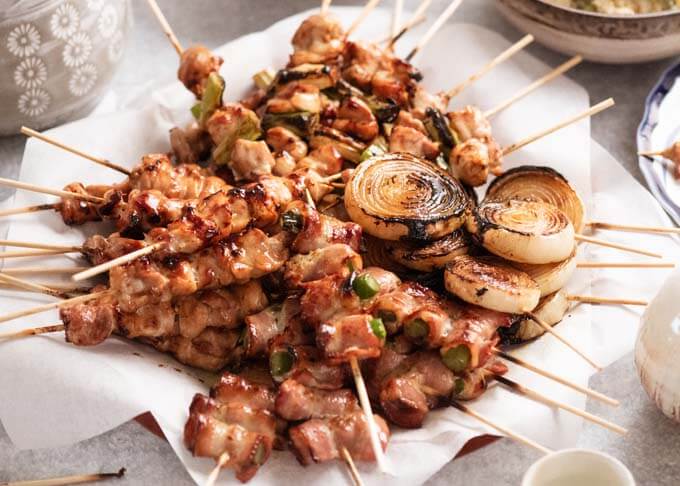
Yakitori is Japanese skewered chicken, cooked on a charcoal grill with either sweet soy sauce or just salt. It is great for entertaining a big crowd as it is a kind of finger food. It is so tasty that you will not realise how many skewers you eat!
I posted my Yakitori recipe more than 5 years ago. I decided to re-publish this because my Yakitori recipe was featured in Good Food online magazine. Well, the article was written by my daughter Nagi, the creator of RecipeTin Eats, but the recipe is mine. We also produced a video for this, which I included in this post.
Yakitori (焼き鳥) is probably one of the most popular dishes in Japan. It is so popular that in Japan there are many shops and restaurants that specialise in just yakitori. It is of course one of the regular street foods sold at food stands when festivals are on, along with Yakisoba (Japanese Stir Fried Noodles) and Okonomiyaki (Japanese Savoury Pancake).
Yakitori is also sold in the food courts of department stores and supermarkets. Japanese people often buy cooked yakitori for dinner from there. I do not think most Japanese households make yakitori at home anymore.
Here in Sydney, yakitori is listed in à la carte menus at Japanese restaurants, but you can easily make it at home. It takes a bit of time to put small pieces of meat onto skewers, but the effort certainly is worthwhile.
The word ‘yaki’ (焼き) comes from the verb ‘yaku’ (焼く), which means grill or bake. And ‘tori’ (鳥) is bird or chicken meat. So, yakitori literally translates to ‘grilled chicken’. However, these days even some of the specialty yakitori shops serve other kinds of meet such as pork and vegetables grilled on skewers.
YAKITORI MENUS
If you go to one of the yakitori restaurants in Japan, you will be amazed to see how many different parts of chicken are on the menu. Common menu items are:
- Negima (ねぎま, chicken and green onions)
- Momo (もも, chicken thigh)
- Mune (むね, chicken breast)
- Sasami (ささみ, chicken tenderloin)
- Bonjiri (ぼんじり, chicken tail)
- Kawa (皮, chicken skin)
- Tsukune (つくね, chicken mince ball)
- Tebasaki (手羽先, chicken wings)
- Rebah (レバー, liver)
- Hatsu (ハツ, heart)
- Sunagimo (砂肝, gizzard)
- Yagen or nankotsu (ヤゲンor 軟骨, cartilage)

Yakitori Flavour
There are two main kinds of yakitori flavours – tare (タレ, soy-flavoured sweet sauce) and shio (塩, salt).
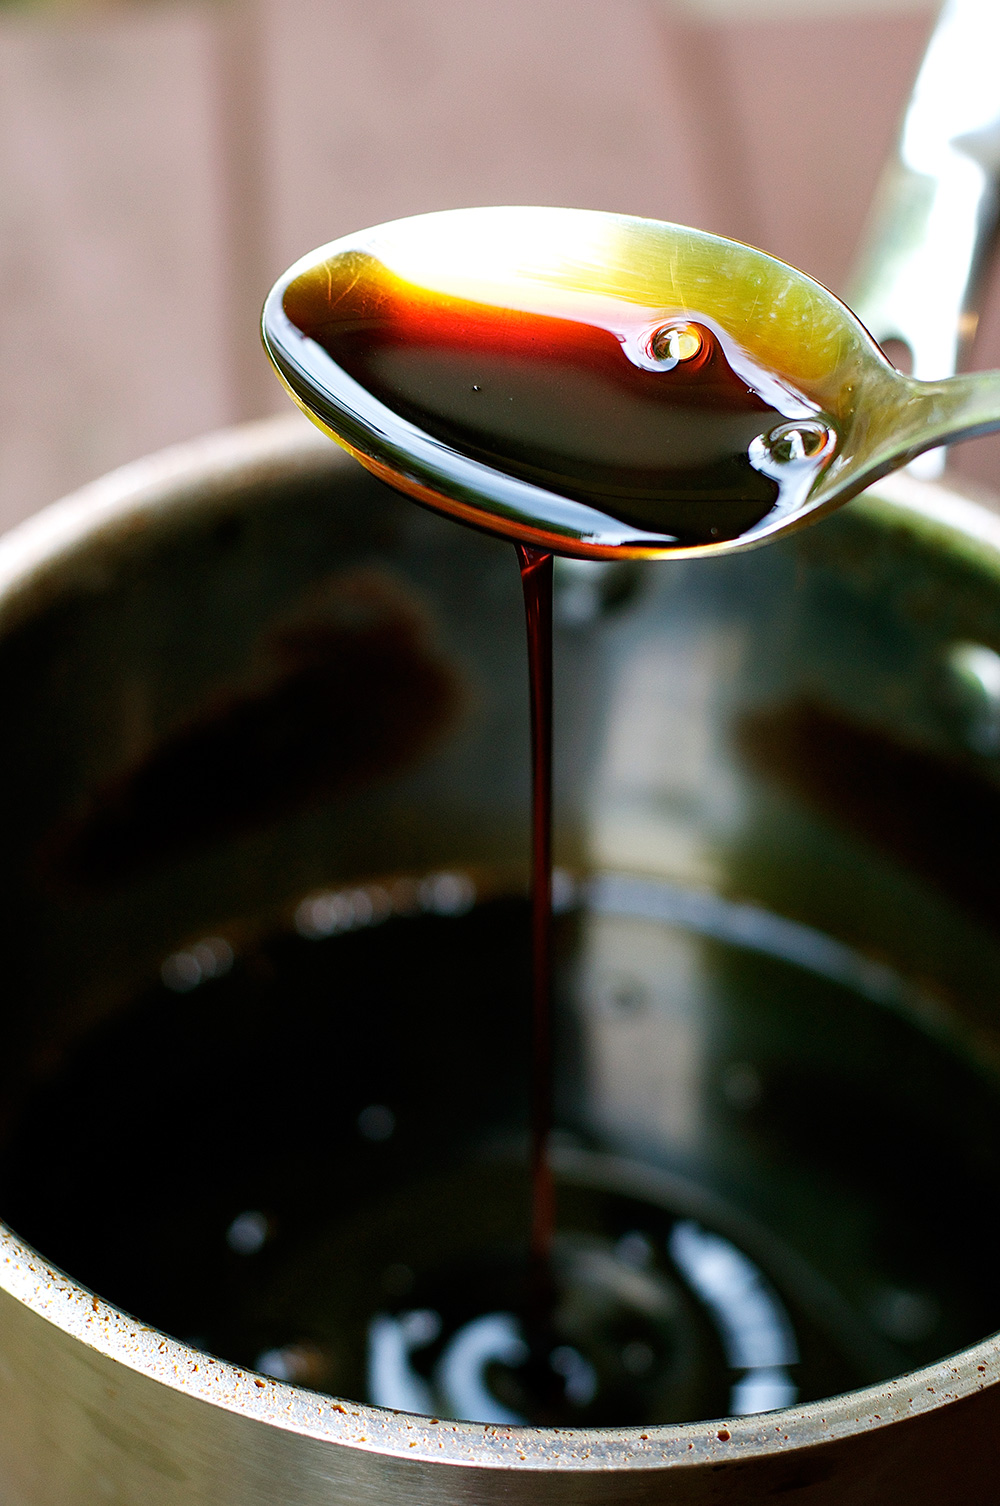
Tare is made of soy sauce, mirin and sugar, with or without sake (Japanese rice wine). It is made by mixing these ingredients and condensing it into a stronger flavour and thicker sauce. When grilling, you baste the sauce onto the meat.
Shio flavour is made simply by sprinkling salt over the meat when grilling.
Most of the chicken parts listed above are great with either tare or shio flavour. But I think liver and heart taste better with tare, while chicken wings are nicer with shio.
Yakitori Skewers
The skewers for yakitori are made of bamboo. The most commonly used yakitori skewer is quite thin (about 3mm / ⅛” diameter) and pointy at one end so that you can thread the meat on easily. It is called ‘marugushi’ (丸串, round skewer). The word ‘maru’ (丸) means round and ‘gushi’ comes from the word ‘kushi’ (串) meaning skewer.
The length varies, but usually it’s about 15cm/6”, which is just the right length if you use a specialised yakitori grill because the width of the grill is 10cm / 4″. The yakitori shops in Japan use 15cm / 6″ skewers. But I sometimes use 18cm / 7″ skewers as they are easier to hold.
Other types of bamboo skewers used for yakitori include hiragushi (平串, flat skewer) and teppōgushi (鉄砲串, gun-shaped skewer) both of which have a flat, squarish stick with a pointy end on one side. You can see teppōgushi used in Tsukune (Japanese Chicken Meatballs). Because of its square shape it holds the meat more securely.
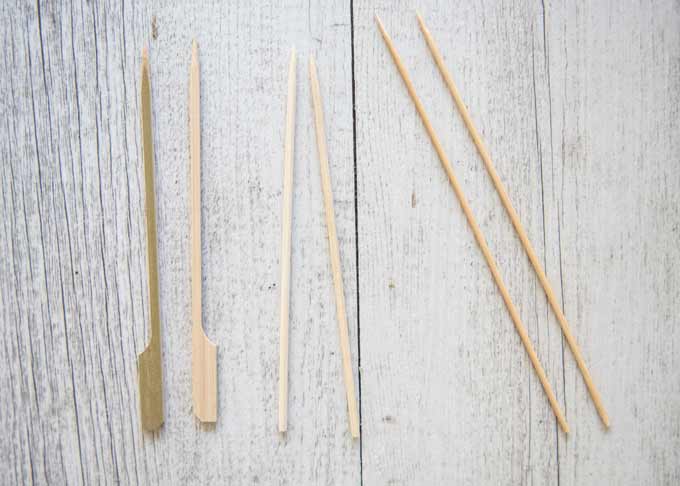
From left to right: 15cm teppōgushi (gun skewer), 15cm marugushi (round skewer), 18cm marugushi.
Yakitori Grill
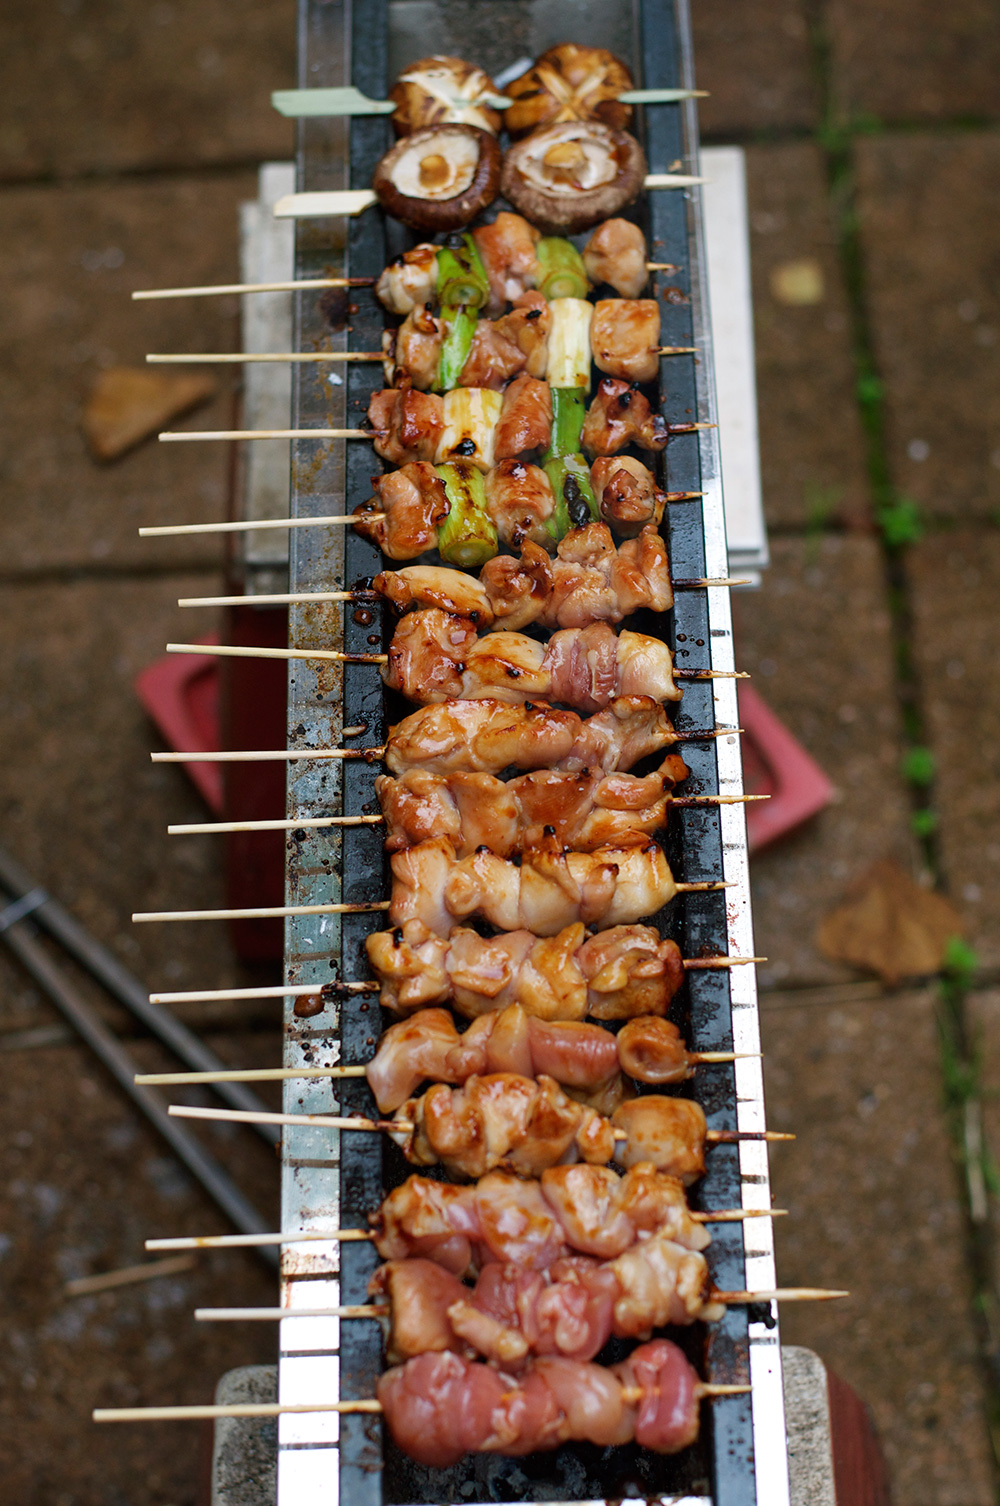
There is a special grill for cooking yakitori. Its shape is a long rectangle shape and inside the block where the charcoal is placed is lined with stones. The yakitori is placed on top. They are quite handy to cook yakitori on as the width of the heated area is about 10cm / 4” and it is just right for the yakitori skewers.
See the photo below of our yakitori grill which I carried back from Japan when my son half-jokingly asked me to get one quite some time ago. It was 10kg / 22Lbs! But we are certainly making use of this quite a bit.
Perhaps not exactly the same as my yakitori grill, but you can buy a hibachi grill from online shops such as eBay and Amazon. Even if you don’t have such a grill, you can still make delicious yakitori. The best alternative is a BBQ grill. A BBQ plate is not suitable as the sauce accumulates on the plate and starts burning.
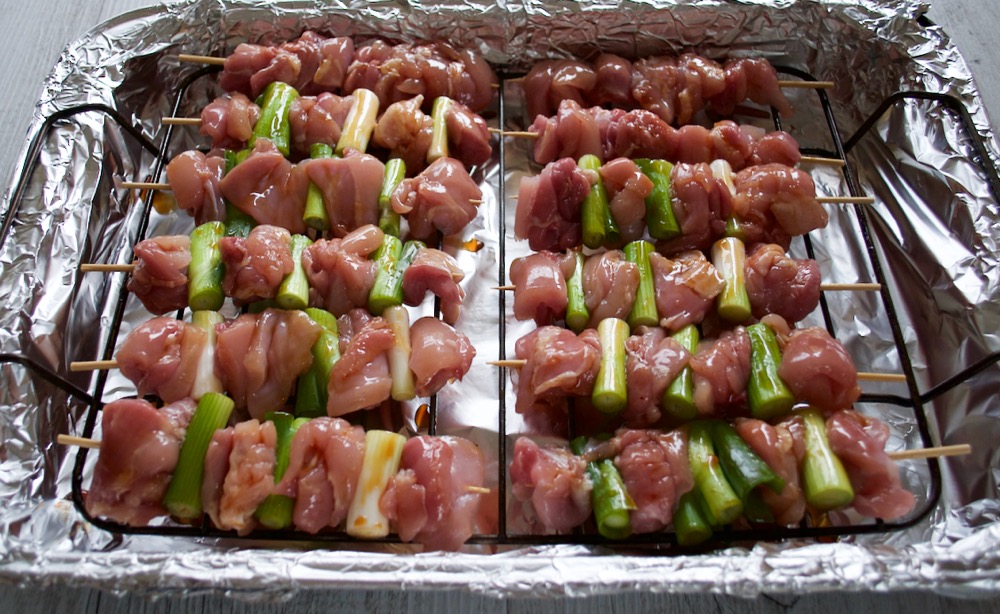
You could also cook yakitori in the oven using a griller/broiler. I have included the method of cooking yakitori in the oven in the recipe. The photo below is how I paced yakitori to cook under the oven grill. I used a deep baking tray and a rack.
What’s in my Yakitori
In today’s recipe, I made momo and negima from the list above. I also included grilled onion rings on skewers as well as bacon & asparagus on skewers so that you get some more vegetables.
I used tare (sweet soy-flavoured sauce) for the chicken skewers and onions.
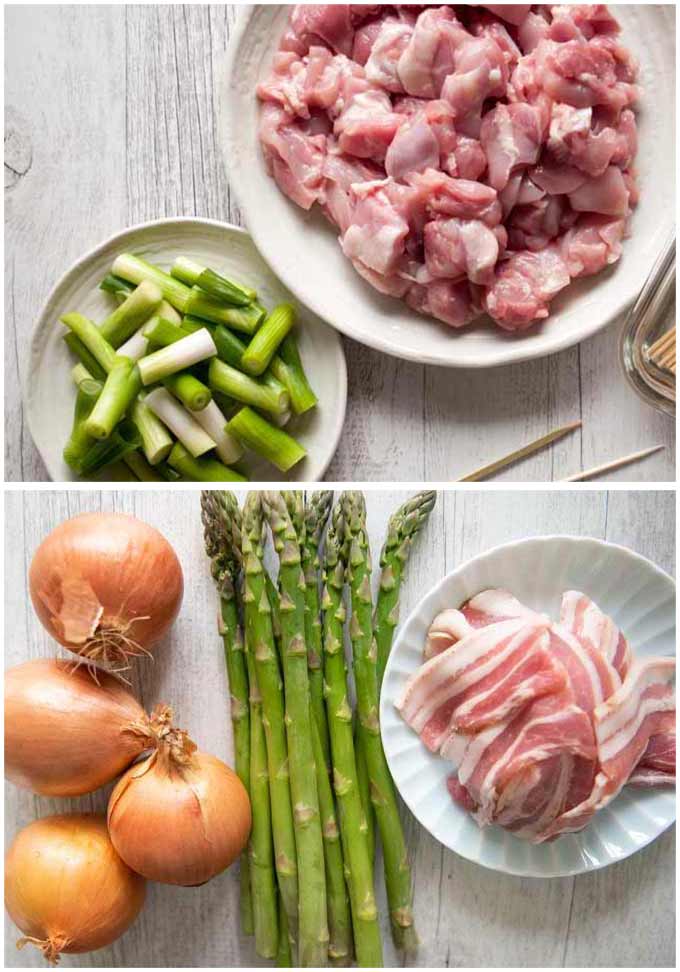
- Chicken thigh fillets
- Green onion stems
- Medium-size onions
- Asparagus
- Streaks of thinly sliced English bacon
Tare
- Soy sauce
- Mirin
- Sugar
The amount of tare I made is probably excessive. But it’s better to have too much than not enough. The leftover tare can be used for Teriyaki Chicken (you may need to dilute the tare). Alternatively, bring the leftover tare to a boil, cool it down, then freeze it.
How to make Yakitori and vegetables on skewers
Making Tare
- Put all the Tare ingredients in a small saucepan and bring it to a boil.
- Reduce the heat to simmer and cook for about 5 minutes until the quantity of tare is reduced by a third.
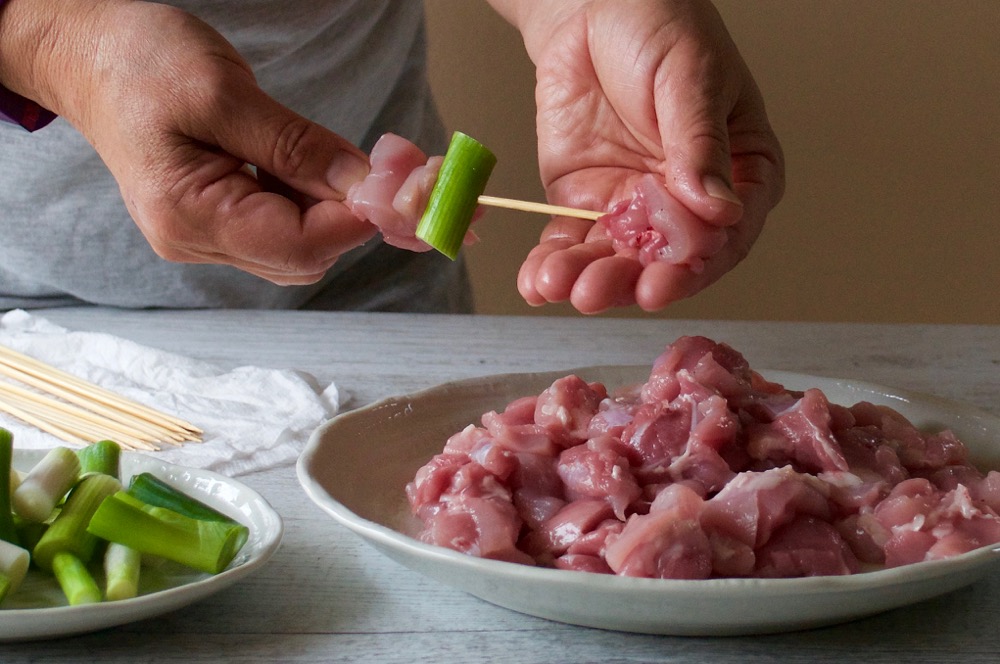
Momo and Negima
- Cut chicken into 2.5cm / 1″ cubes.
- Cut green onion stems into 3cm / 1⅛” long pieces.
- To make momo, put 5 chicken pieces on each bamboo skewer.
- To make negima, use 3 pieces of chicken and 2 green onion pieces on each skewer. Start with chicken and alternately thread chicken and green onions, ending with chicken.
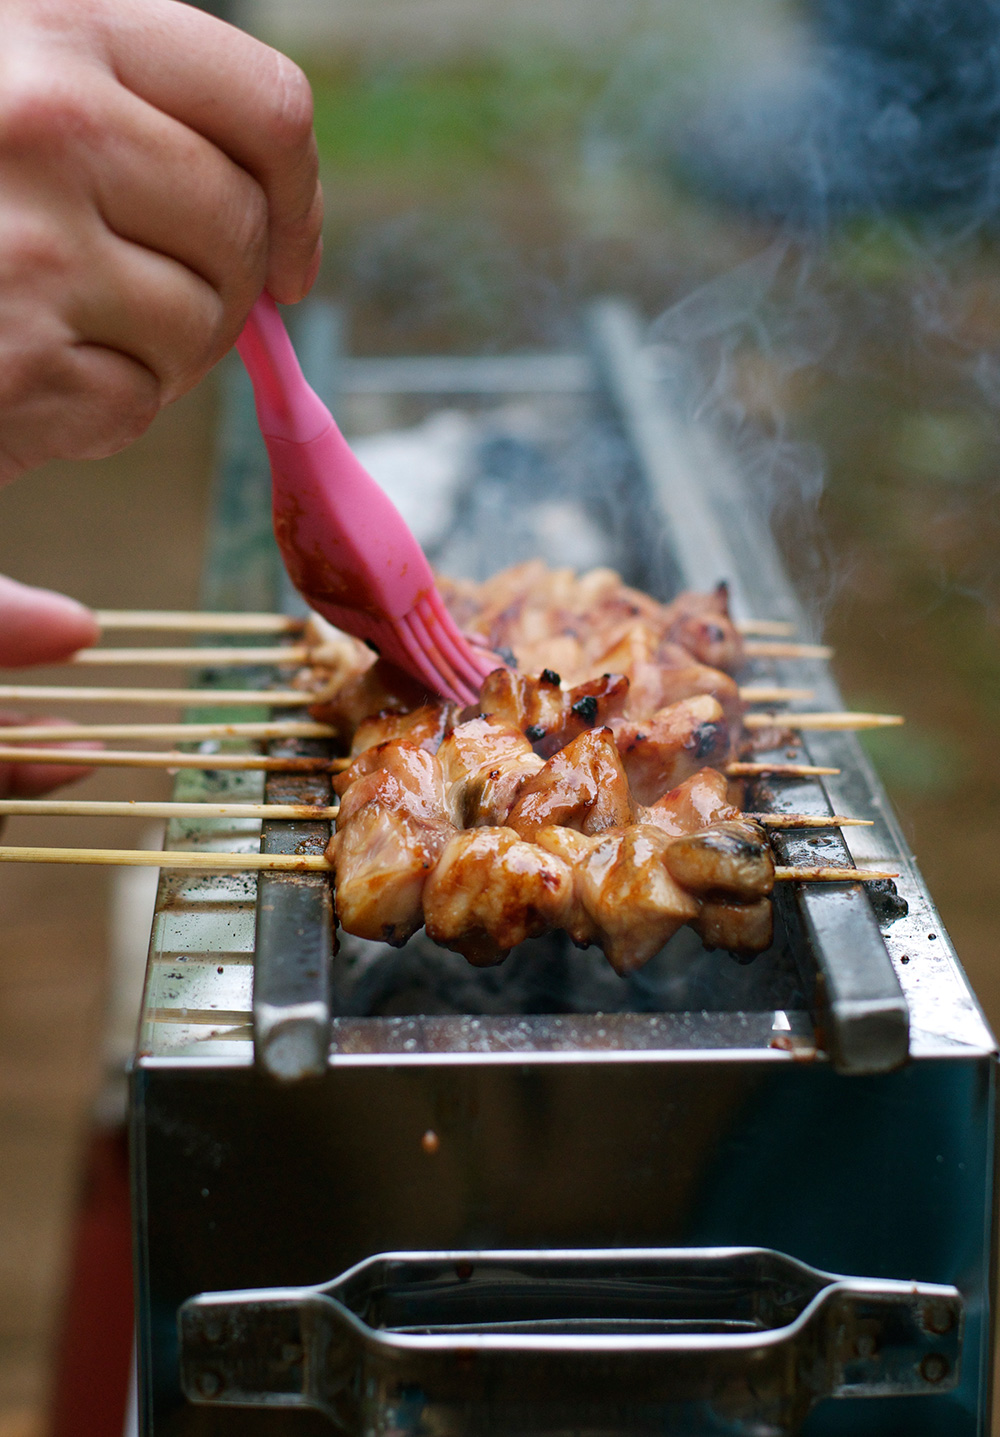
- Lightly baste both sides of the chicken and cook on the grill for 3-4 minutes.
- Flip skewers and brush the surface with tare. Cook for 3 minutes.
- Flip over, brush the surface with tare and cook for 30 seconds.

Onion Ring
- Cut off the stem end and root end of the onion.
- Cut horizontally into 1.3-1.5cm / ½-⅝” thick round slices.
- Thread 2 slices crosswise on each skewer.
- Cook onion skewers on the grill for a few minutes.
- Flip skewers and brush the surface with tare. Cook for a few minutes.
- Flip over, brush the surface with tare and cook for 30 seconds.
Bacon and Asparagus
- Trim the end of the asparagus stems.
- Cut each asparagus spear into 5 x 3cm / 1⅛” long pieces.
- Cut streaky bacon into 6-7cm / 2⅜-2¾” long pieces.
- Wrap asparagus pieces with bacon and thread them onto skewers.
- Cook on the grill for a few minutes on each side.
Even if you pick different yakitori menu items, the preparation and grilling methods are the same.
You don’t marinate chicken before grilling yakitori. The sauce is easy to make and once you put the meat onto skewers, just grill them and baste the sauce from time to time. That’s all it takes! I hope you try it.
Yumiko![]()
Watch How To Make It
Yakitori is Japanese skewered chicken, cooked on a charcoal grill with either sweet soy sauce or just salt. You DO NOT marinate the chicken before cooking through. Yakitori is great for entertaining a big crowd as it is a kind of finger food. It is quite easy to make. (Watch the Video)
In this recipe, I am sharing the two most common yakitori - negima (chicken and shallots/scallions yakitori) and momo (plain chicken thigh yakitori) with sweet soy sauce. I also included onion rings on skewers and bacon & asparagus on skewers.
The recipe also includes different methods of grilling yakitori – on a yakitori grill/BBQ and using the oven grill/broiler.
Cook time can vary a lot depending on how many skewers you can grill at once.
- 15 bamboo skewers soaked in water for 30 minutes (Note 1)
- 750g / 1.7lb skinless chicken thigh fillets , cut into 2.5cm / 1” cubes (Note 2)
- 15 bamboo skewers soaked in water for 30 minutes (Note 1)
- 450g / 1lb skinless chicken thigh fillets , cut into 2.5cm / 1" cubes (note 2)
- 30 green onion pieces (3cm / 1⅛" long, white and green firm parts only)
- 8 bamboo skewers soaked in water for 30 minutes (Note 1)
- 4 small onions , cut horizontally into 1.3-1.5cm / ½-⅝" thick (note 3)
- 10 bamboo skewers soaked in water for 30 minutes (Note 1)
- 10 thick asparagus spears , end trimmed (about 15cm / 6" long and 1.3-1.5cm / ½-⅝" in diameter, note 4)
- 40 thin streaky English bacon pieces (7cm / 2¾” long, about 360g / 0.8lb, note 5)
-
Add Sauce ingredients to a pot and bring to a boil. Turn down the heat to medium or medium low and simmer for about 5 minutes to reduce the quantity by about a third. (Note 6).
-
To make momo (chicken thigh), thread around 5 pieces of chicken onto the skewers.
-
To make negima, start with chicken and alternately thread chicken pieces and green onion pieces, ending with chicken. Thread 3 chicken pieces and 2 green onions onto each skewer.
-
Thread 2 onion slices, crosswise, onto each skewer.
-
In a large pot, bring a sufficient amount of water and bring it to a boil. Add a pinch of salt and blanch asparagus spears for 30 seconds.
-
Drain asparagus spears and cool them down quickly under cold running water or by putting them in ice water.
-
Cut each spear into 3cm long pieces. You will get 5 pieces from each spear, which will make one Bacon & Asparagus skewer.
-
Starting from the piece at the bottom end of the spear, wrap each piece in a piece of bacon, except the last two pieces, i.e., the tip and the piece next to the tip, and thread them onto a skewer.
-
Place the tip and the piece next to the tip together side by side and wrap them in a piece of bacon, then thread them onto the skewer on top.
Repeat for the rest of the asparagus spears (note 7).
-
The distance between the hot charcoal and where the skewers are placed should be about 5-6cm / 2-2½” (Note 8).
-
In the case of BBQ, oil (not in ingredients) the grill.
-
Using a brush, lightly baste both sides of the skewers with sauce and cook for about 4 minutes.
-
Turn them over and baste the upside (cooked side) while cooking for about 4 minutes.
-
Turn them over again and baste the upside (cooked side) while cooking for 30 seconds or so.
-
Turn them over once more to cook for 30 seconds or so. (Note 9)
-
Remove from the grill and place it onto a plate. Serve immediately.
-
Cook Bacon & Asparagus skewers for 3 minutes on each side without basting with sauce.
-
When the bacon becomes golden, it is ready.
-
Turn the oven grill on to high.
-
Line a large baking tray with aluminium foil (Note 10). Place a wire rack on it and oil the rack (not in ingredients).
-
Using a brush, lightly baste both sides of skewers with sauce and place the skewers on the rack. I used 70cm x 26cm / 14½” x 10¼” baking tray and I could fit all the skewers onto ot.
-
Place the baking tray under the oven grill. The distance between the skewers and the grill should be about 5cm / 2”.
-
Cook for 5-6 minutes, then take the tray out and turn the skewers over.
-
Baste the upside (cooked side) of the skewers and place the tray back under the grill.
-
Cook for 4-5 minutes, then take the tray out and turn the skewers over again.
-
Baste the upside (cooked side) of the skewers and place the tray back under the grill.
-
Cook for a minute or until the chicken and shallots/scallions start getting charred a bit.
-
If required, turn the skewers once more to char the other side.
-
Remove the skewers from the tray and place them onto a plate. Serve immediately.
1. I used thin round 18cm / 7" bamboo skewers. But you could use 15cm, slightly longer skewers or flat skewers. I find that thin round skewers are the easiest to thread the chicken pieces.
Soaking the bamboo skewers is very important. It prevents the skewers from getting burnt too quickly when grilling.
The number of skewers required varies depending on how many pieces of chicken you put on each skewer. Since my yakitori grill is 10cm wide, I put ingredients on a skewer to fit in this width.
2. I bought thigh fillets that did not have skin on this time. But I sometimes use thigh fillets with skin on, which is equally delicious. You could also use chicken breast instead of thigh, or a mixture of both.
3. If you can only find large onions, you may want to put one large slice onto each skewer. Then you probably need a couple of onions.
4. If your asparagus is much longer/shorter, you will need to adjust the number of spears required because the number of pieces you will get from each spear will be more/less respectively. I cut 5 x 3cm / 1⅛" long pieces from each spear.
5. My English bacon strip was 20cm / 8" long. So I cut each strip into 3 equal size pieces.
6. Depending on the size of the pot, the time taken to reduce the sauce varies.
7. If you cut more/less than 5 pieces from each spear, you won't always end up with spears at the top. But that's OK.
8. Depending on the griller/BBQ, you may need to adjust the distance/spacing as the temperature of the heat varies. The heat should be medium high to high.
9. I basted twice on each side, but you can turn them over once more with another coating of sauce if you prefer a stronger flavour.
10. If you don’t line the baking tray with aluminium foil, the sauce will drop directly onto the tray and get burnt badly due to the sugar in the sauce. Line the baking tray so that you don't have to clean the mess later.
11. Nutrition information is for 1 skewer of momo assuming 15 skewers are made with equal distribution of ingredients.
serving: 57g calories: 109kcal fat: 7.3g (11%) saturated fat: 2g (10%) trans fat: 0.0g polyunsaturated fat: 1.6g monounsaturated fat: 3.1g cholesterol: 48mg (16%) sodium: 253mg (11%) potassium: 110mg (3%) carbohydrates: 2.1g (1%) dietary fibre: 0g (0%) sugar: 1.8g protein: 8.6g vitamin a: 1% vitamin c: 0% calcium: 0.4% iron: 1.9%
Originally published in September 2016. Rewritten in November 2021 with new photos and video added. Recipe has also changed to include other ingredients and also increase the quantity.
Meal Ideas
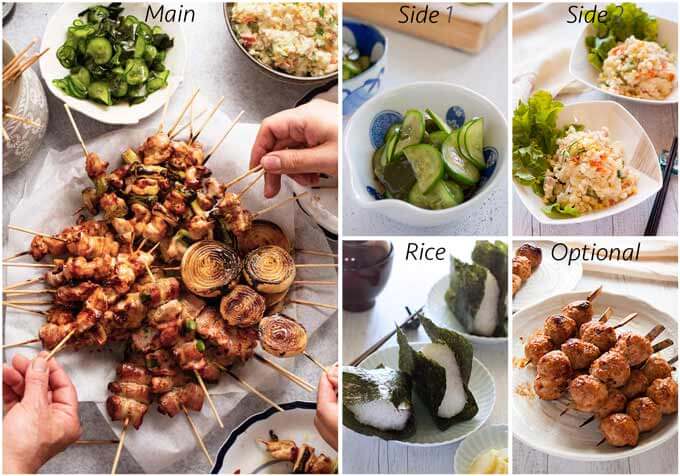
A typical Japanese meal consists of a main dish, a couple of side dishes, a soup and rice. I try to come up with a combination of dishes with a variety of flavours, colours, textures and make-ahead dishes.
You might have noticed the hero shot of this post (the first photo) shows a couple of side dishes – Japanese Potato Salad and Cucumber and Seaweed Sunomono. So I decided to include them in today’s Meal Ideas. the vinegar dressing used in Sunomono cleanses the palate.
We often grill plain Onigiri (Japanese rice Balls) with no fillings. Brush with soy sauce to give flavour while grilling them.
I also added Tsukune as an optional Yakitori item since I always include Tsukune when we have a yakitori party.
- Main: Yakitori – today’s recipe, can prepare ingredients on skewers the day before.
- Optional: Tsukune – prepare ingredients on skewers the day before.
- Side dish 1: Cucumber and Seaweed Sunomono (Vinegar Dressing) – or other side dish with vinegar dressing.
- Side dish 2: Japanese Potato Salad – make ahead.
- Rice: Grilled Onigiri – make small onigiri with no fillings and without yaki nori wrapping. Grill both sides of onigiri, brush with soy sauce, then grill more until the surface becomes crunchy.
This Yakitori guide is very detailed—thanks for sharing!
Do you think recipes like this could also help teach kids about Japanese food culture? I’ve noticed some teachers use interactive food quizzes on platforms like Blooket to make lessons more engaging. What are your thoughts on combining cooking with learning?
Definitely, yes! It’s a fun way of learning for kids.