Nothing is more comforting than onigiri (おにぎり, Japanese rice ball) wrapped in yaki nori (焼き海苔, roasted seaweed sheet) with grilled salted salmon inside the rice! It’s such a simple food but it is so good you can’t stop eating. Instead of salmon or other popular protein, you can add pickled vegetables or pickled salty plum to make it vegetarian.
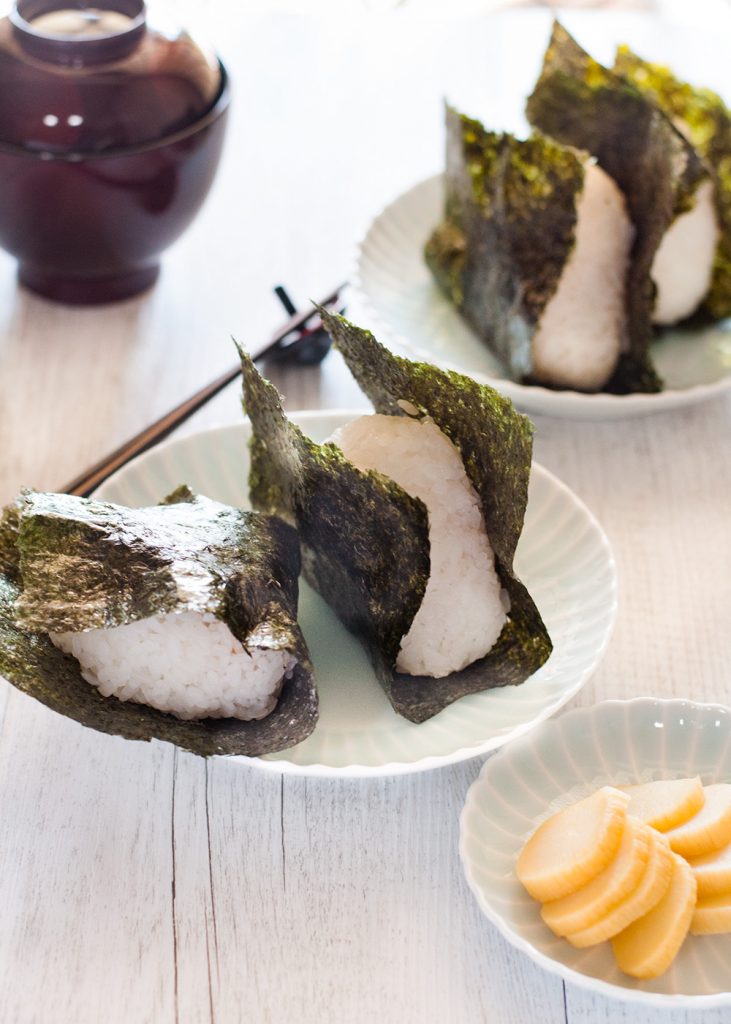
Onigiri (おにぎり) is a Japanese rice ball made from cooked rice formed into triangular or flat round shapes. The name came from the verb nigiru (握る, to hold) which is how you make a rice ball and how you eat it. You might also hear people call it omusubi (おむすび) or nigirimeshi (にぎり飯).
A long time ago, onigiri was just a ball of rice with salt around it and people carried them when travelling. But these days, onigiri usually has fillings in the middle and is wrapped with yaki nori (焼き海苔, roasted seaweed sheet). It used to be a typical home cooking food but you can now buy onigiri at convenience stores anytime, anywhere in Japan. It is like a sandwich in Western culture.
Just like sandwitches can have different ingredients between the slices of bread, nowadays you can have almost anything inside onigiri.
ONIGIRI FILLINGS
Onigiri are meant to keep for a while so that you can take them for lunch or a picnic. The fillings are traditionally salty or sour ingredients to keep them longer.
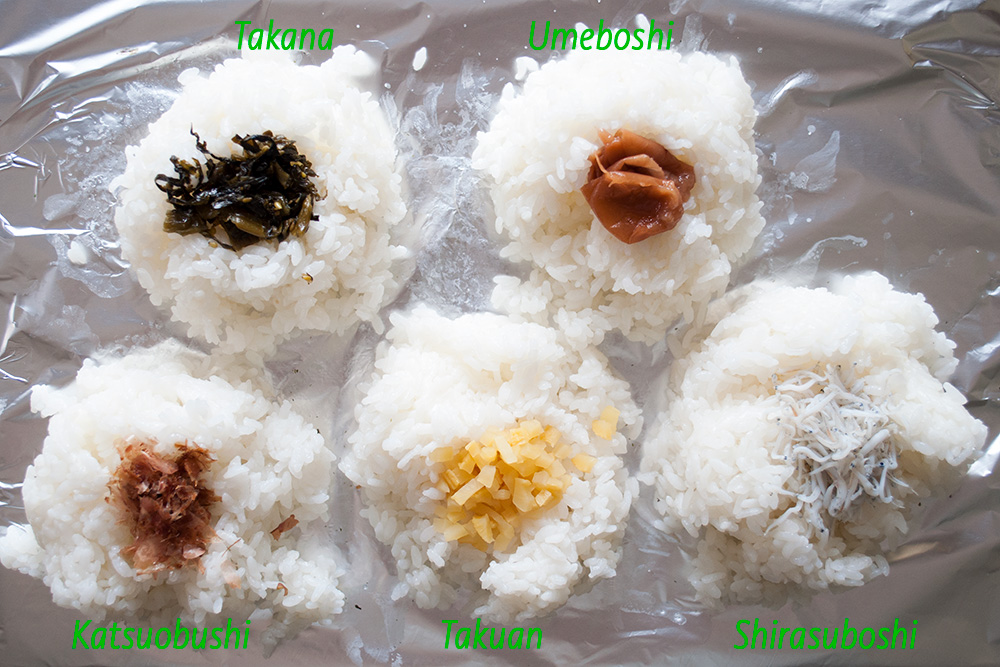
Typical fillings include sake (鮭, grilled salted salmon – the same spelling as Japanese rice wine, but the intonation is different with the accent at the beginning), katsuobushi (鰹節, dried bonito flakes), tarako (たらこ, salted fish roe), shirasuboshi (しらす干し, dried tiny sardines), umeboshi (梅干し, pickled plum), takuan (沢庵, pickled white radish), pickled takana (高菜, mustard greens), and shiokonbu (塩昆布, salted kelp strips).
The photo below shows the ingredients I had that I could have used as onigiri fillings. In the case of katsuobushi, a small amount of soy sauce is added to give it salty flavour.
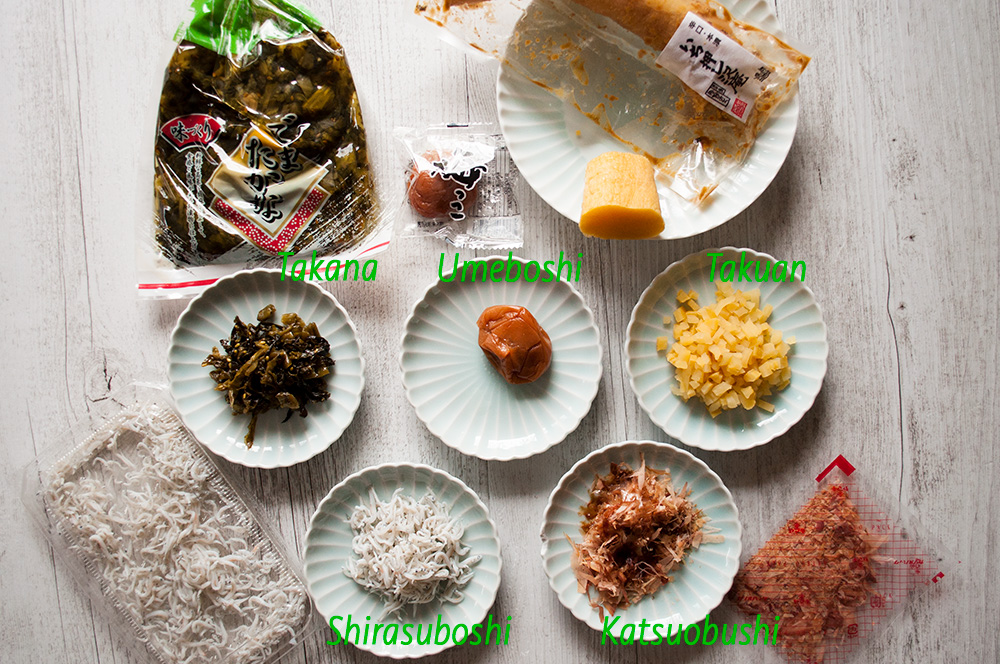
I like traditional fillings. I like almost all of the traditional fillings but my favourites are grilled salmon, slated cod roe and takana. But at convenience stores, you find onigiri with fillings like prawns and mayonnaise, tuna and mayonnaise!
YAKI NORI (ROASTED SEAWEED SHEET)
The size of yaki nori used for onigiri varies from household to household. Sometimes an onigiri has a tiny sheet of yaki nori merely to hold the onigiri so that the rice grains do not stick to your fingers.
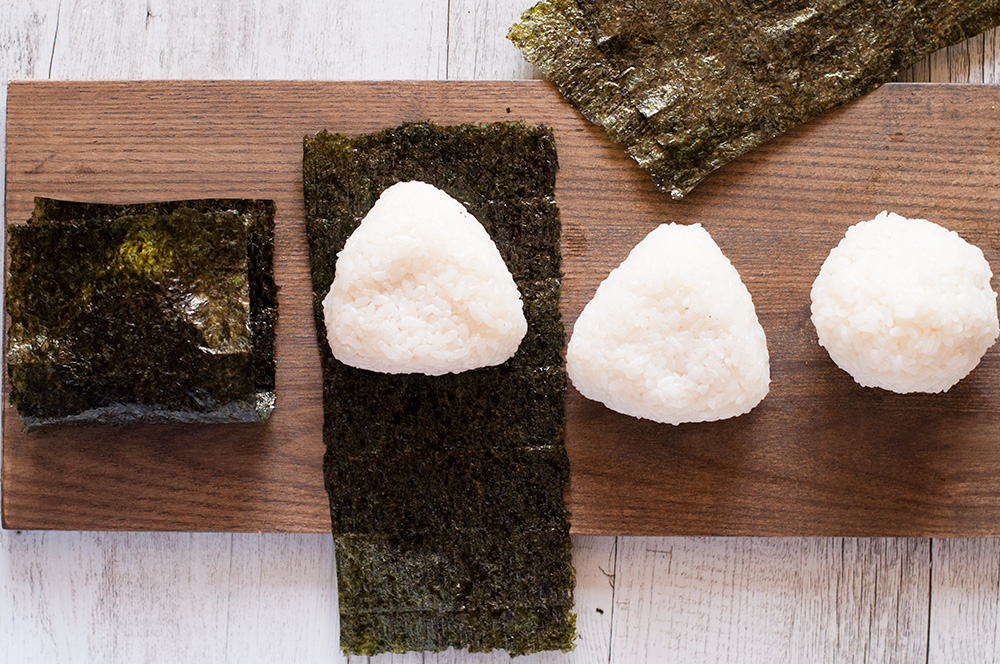
My onigiri uses a half size of the standard yaki nori sheet. The standard sheet is 19cm x 21cm (7½” x 8¼”) and the half size of this yaki nori sheet can cover the entire onigiri.
There are no rules to it and you don’t even need to have yaki nori.
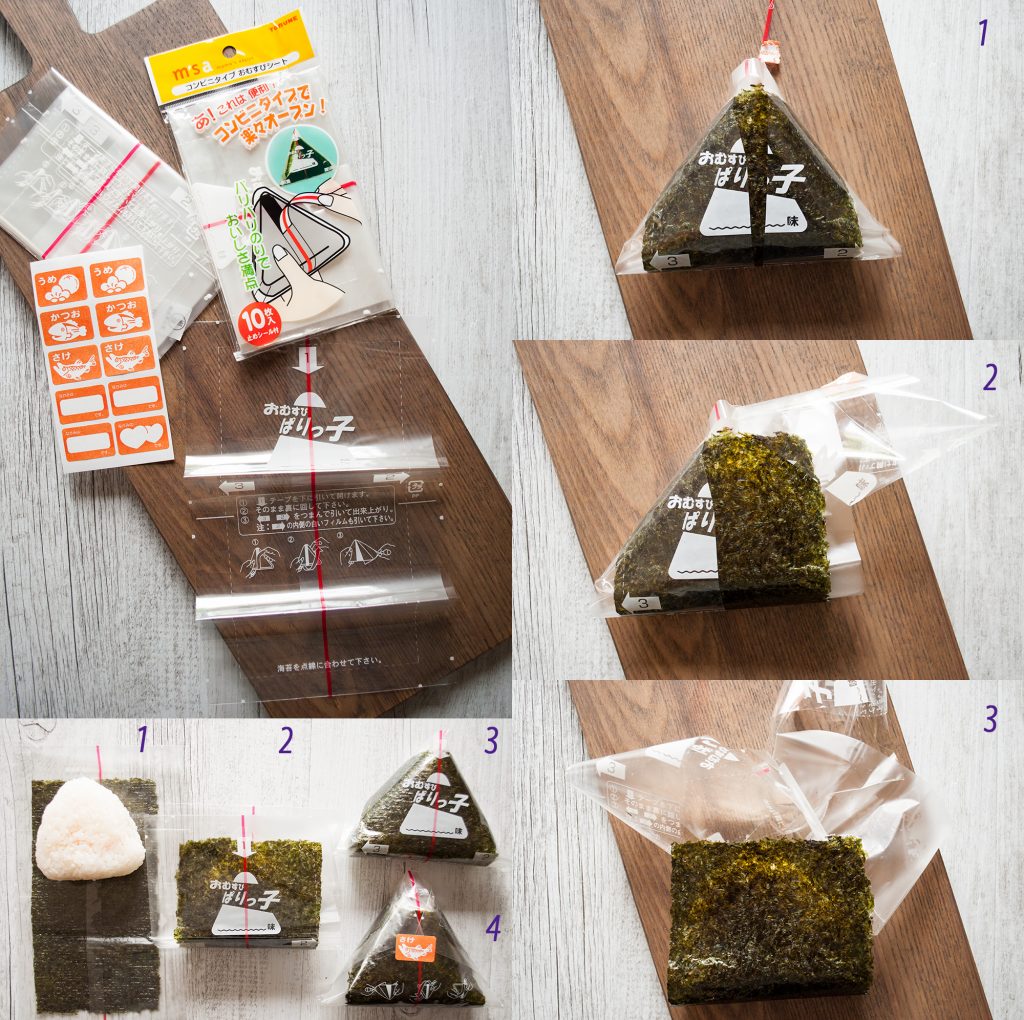
ONIGIRI SHEET (GREAT JAPANESE INVENTION!)
As soon as you wrap an onigiri with a yaki nori sheet, the yaki nori starts losing crispness due to the moisture from the rice. If you take some onigiri for lunch for example, the yaki nori softens and clings around the onigiri. When you bite it, you will notice that the yaki nori has become rather chewy.
To avoid loss of crispness, the Japanese invented a plastic film called “onigiri sheet” (おにぎりシート) or “omusubi sheet” (おむすびシート). Onigiri sheets were originally used for mass production of onigiri that were sold at convenience stores. Now you can buy onigiri sheets at discount shops such as Daiso or some Japanese/Asain grocery stores.
The idea is to place a yaki nori sheet between two sheets of plastic film and wrap an onigiri in the plastic film so that the yaki nori does not touch the rice. When you eat onigiri, simply peel the narrow red line of the plastic film in the middle to halve the plastic and remove the plastic film. The yaki nori sheet is as crisp as new!
It is difficult to explain in words but hopefully the photos below show you how it works. The top left photo shows the pack of 10 onigiri sheets which also comes with 10 stickers to put on the back of the wrapping to seal it. Some stickers already have popular fillings printed on them such as salmon (which I used in the photo). The numbers on the other photos are the sequence of actions to wrap (bottom left photo) and to open (right photos).
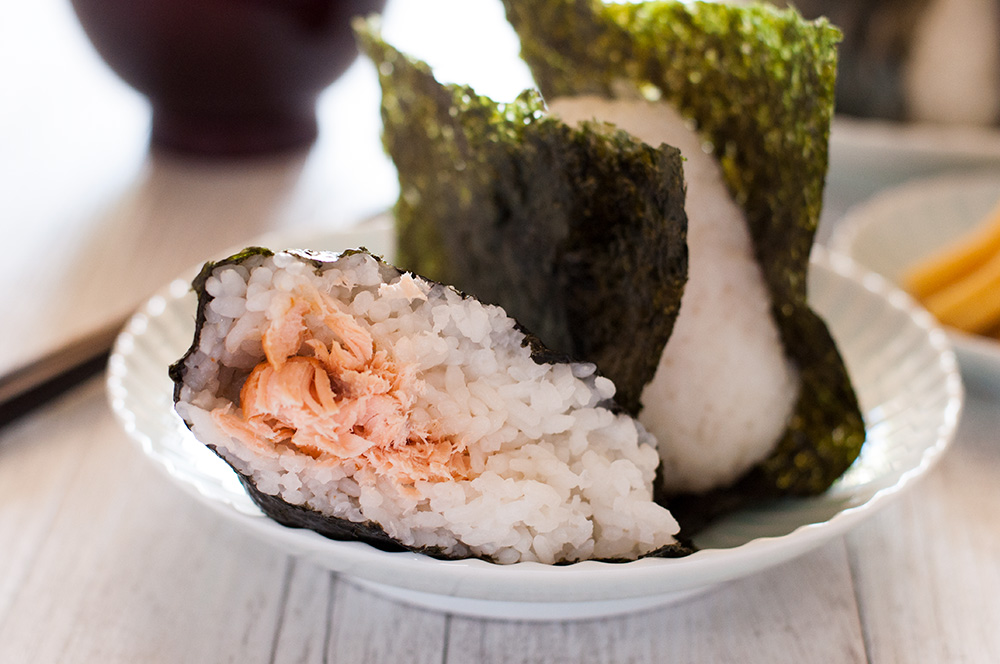
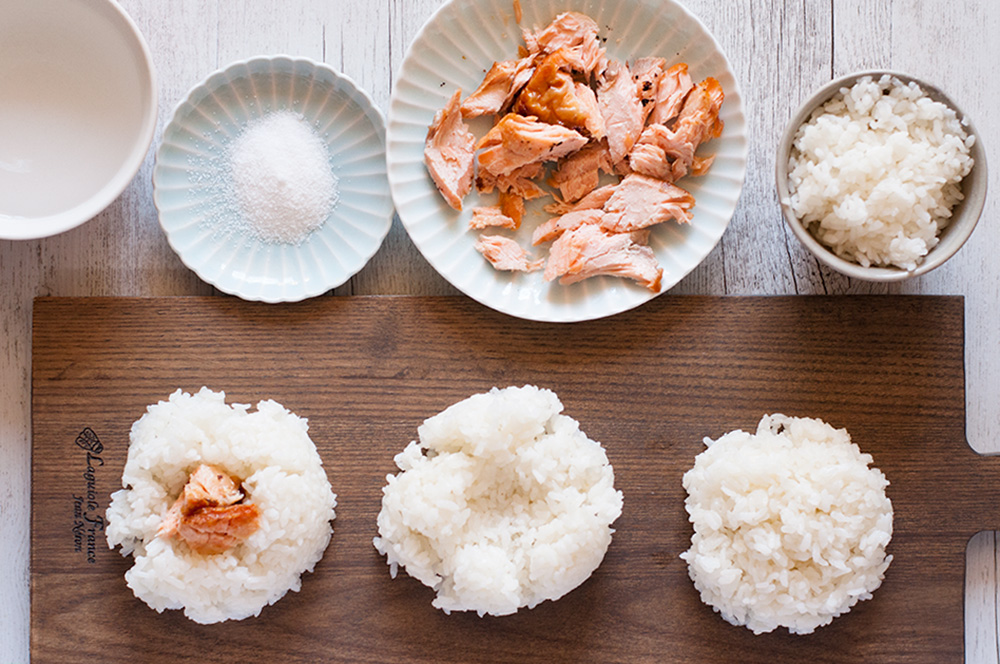
I only made grilled salted salmon onigiri today as I believe the salmon is the best of all the onigiri fillings. My children would agree with me 100%. The photo below shows how I place grilled salmon in the rice and make onigiri. But for more details of how to shape onigiri, please watch the video below the recipe.
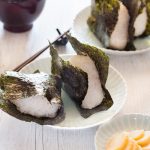
When you take a big bite into the onigiri and see a big chunk of grilled salmon inside, you just have to smile with satisfaction and happiness!
Yumiko![]()
Watch how to make it
Onigiri (おにぎり, Japanese rice ball) is like a sandwich in Western culture. Why don’t you take rice balls wrapped in yaki nori (roasted seaweed sheet) with grilled salted salmon for lunch? It’s such a simple food but it is so comforting and tasty that you can’t stop eating. Instead of salmon or other popular protein, you can add pickled vegetables or pickled salty plum to make it 100% vegetarian. The shape can be flat and round instead of triangle.
- 120g (4.2oz) grilled salmon with salty flavour , broken into small chunks (note 1)
- 2½ cups cooked rice (hot or warm, note 2)
- a bowl of water (about 1 cup)
- 1 tsp salt in a little shallow bowl/plate (note 3)
- 4 x ½ size yaki nori sheet (note 4)
-
Place a cutting board in front of you and arrange salmon and the onigiri ingredients around it.
-
Add ¼ of the cooked rice to a tea cup or a small rice bowl of 150-180ml (5-6 oz), then turn it over and place the rice on the cutting board.
-
Wet your finger with water and make a well in the centre of the rice using your finger.
-
Add ¼ of the salmon pieces to the well.
-
Wet both palms of your hands with water, then take about ¼ of the salt and rub both palms together to spread the salt over them.
-
Pick up the rice from both sides by making a cup with your hands so that the rice will sit in your palms.
-
Using your thumbs, press down the salmon and then gather the rice around to cover the salmon and bury it in the centre (note 5) and make a rice ball.
-
Place the rice ball on the palm of the left hand, then place your right hand over the rice ball perpendicular to your left hand.
-
Then using mainly three fingers (index finger, middle finger and ring finger), squeeze the rice ball with both hands to shape it into a triangle. The left hand should control the thickness of the onigiri to make it about 4cm (1 ½”) thick and the right hand should shape the triangle. Press firmly but not too tight (note 6).
-
While pressing firmly, occasionally roll the triangle and press to make the onigiri more like an equilateral triangle.
-
Place the onigiri in the centre of a yaki nori sheet and cover both sides of the triangular surface with yaki nori.
-
Repeat for the remaining 3 onigiri (note 7).
1. Grilled salmon with salty flavour is a typical Japanese way of grilling salmon. Before grilling, sprinkle ½ teaspoon of salt (for this size) all over the salmon and leave it for 15 minutes. Then grill it just like grilling any fish.
2. Use short grain rice (preferable) or medium grain rice as the grains need to have starch to stick to each other. Please cook the rice in the way the Japanese do, ie. absorption method. You can visit my post How to Cook Rice The Japanese Way for that.
3. The amount of salt required varies depending on how salty you like the outside of the onigiri to be. You just need to try and adjust.
4. Yaki nori (焼き海苔) is roasted seaweed sheet. A full size yaki nori sheet is 19cm x 21cm (7½” x 8¼”). Cut in the centre vertically along the longer side.
You can make the size of yaki nori sheet much smaller per onigiri if you like as there are no rules to it. You don’t even have to have yaki nori but I find that it is easier to eat onigiri with yaki nori because otherwise the rice will stick to your hands.
5. Check to make sure the salmon is in the middle of the rice ball. If you can see a piece of salmon sticking out or placed very close to the surface of the onigiri, take some rice from the corner of the triangle and cover the salmon.
6. Insufficient firmness will make the rice ball fall apart when picked up or while eating.
7. I usually place 4 mounds of rice on the cutting board at once and do each step for all of them. This seems to be most efficient.
Hi Yumiko! Im going to make this recipe tomorrow for lunch with my child! He loves salmon too so will make the salted salmon for the filling as well. Really excited as I love onigiri 🍙 when we were in Japan I ate at least one a day!
Hi Zoe, that’s great. I am sure your child will love it. You must really be fond of onigiri to have 1 a day!
Oh wow these are awesome! Thank you Yumiko! Perfect for school lunches. We had them with tuna and spicy kewpie mayo and Japanese pickles on the side. So good. Vicky
Hi Vicky, that sounds like a yummy lunch. Your children must have been excited!
Hi Yumiko
Love this recipe as I’ve just came back from Japan and miss it so much! Where can I buy the wrappers from?
Thank you
Hi Karen, I bought a pack of 10 from Daiso discount shop. But some Daiso shops may not stock it. Japanese grocery stores often stock it too, e.g. Lucky Mart in Artarmon. Some wrappers already contain nori sheet inside!
You can also order online, but some shops charge ridiculously high cost.
Hi Yumiko, I love onigiri as the best filling snack when on any sort of a journey. But when in Oz, I don’t eat white rice, brown one only (which I cook by Nagi’s method, not by absorption). Is it possible to make onigiri from brown rice or is it not sticky enough? What would be different from white rice recipes to help brown rice hold together? Thanks
Hi Sergey, I think that you need to cook brown rice differently from Nagi’s method if you want to make it a bit more sticky to form onigiri. The following is the method very close to the typical Japanese way of cooking rice in a pot plus an extra step to make the brown rice more sticky and fluffy.
1. Add brown rice and water to a pot. The quantity of water is 80-120% (depending on how hard/soft you want the cooked rice to be) of the volume of the rice.
2. Mix well and cook at high heat with a lid on. If bubbles start overflowing, reduce heat.
3. Cook for about 15-20 minutes until all the water is evaporated. You can hear a faint crackling sound which indicates that the bottom part of the rice grains are drying up.
4. Add the same amount of water as in Step 1 and mix. Place the lid on and cook further 10-15 minutes, then. reduce heat to low and cook until the water evaporates.
5 Turn the heat off and leave it for 5 minutes as is (with the lid on) to continue to steam.
I hope it works for you.
Hi Nagi, love your site. Can you freeze them and how is the best way to defrost them so the rice is not chalky?
Thank you! Mel
Hi Mel, Yumiko here, Nagi’s mother and the owner of RecipeTin Japan site.
Although I never have frozen Onigiri, you can freeze it. If freezing, do not wrap the rice ball with nori sheet and warp the rice ball (with salmon inside) in cling wrap. You can keep them in the freezer up to about 3 weeks. Microwave Tod efrost until the rice grains become heated up (key to the fluffy rice), then warp in nori sheet.
I should try it one day!
I really Like Onigir so I hope You make more Sites Like This.Sayōnara!
Hi Juan, so do I! This post is all abut the traditional nigiri but perhaps I need to post variations of onigiri with different ingredients. Thanks for your comment.
I love onigiri 🙂
So do I!
Hello, I love your page. We had Nagi’s recipe ‘Asian grilled salmon’ last night and I have a piece left over. I will use it today in this recipe. Thank you
Hi Lydia, I hope you had yummy onigiri with the salmon!
Konnichiwa Yumiko-san! Once again I truly appreciate your detailed explanations! I am learning so much! These sound like perfect little sandwiches or appetizers. The best thing is I have local access to all of the ingredients!
Hi Dorothy-san.Thank you! I do hope you make onigiri, since you love salmon.