Have you ever wondered if you could make the long, fat sushi rolls that you buy from take away sushi shops? I’ll show you how to make them. It’s not very difficult to make Take Away Sushi Rolls once you prepare the sushi rice and the ingredients to go in the middle.
I posted Sushi Rolls (Norimaki) in late 2017. They are very small – about 3cm wide and 6-7cm long.
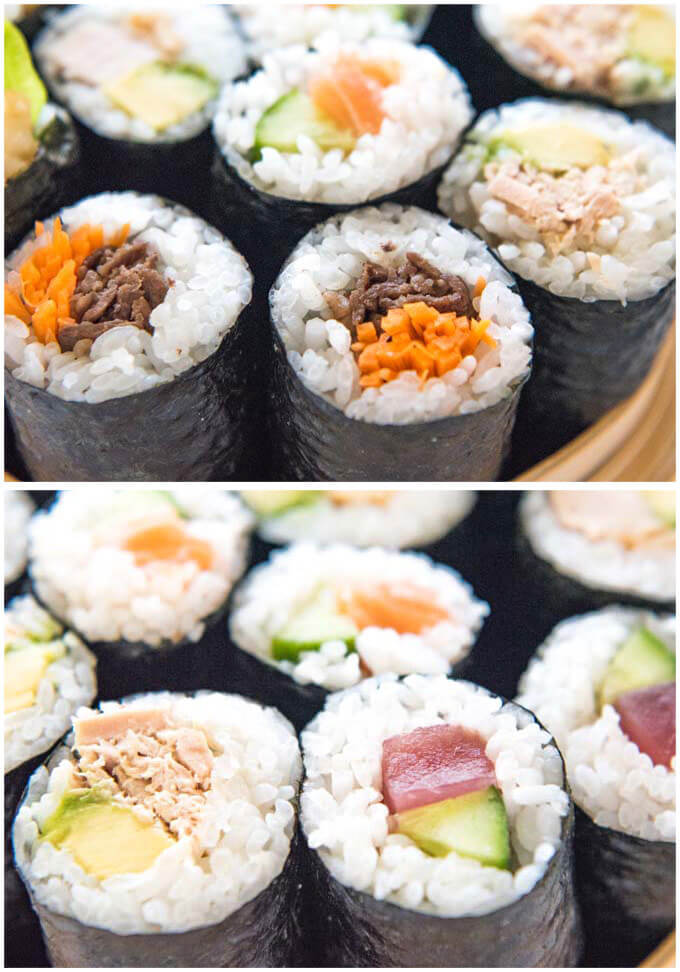
Today’s sushi rolls are much larger and they are exactly like those you get from take away sushi shops. They are 4cm thick and about 10cm long – perfect to grab and bite into even while walking.
What you will need
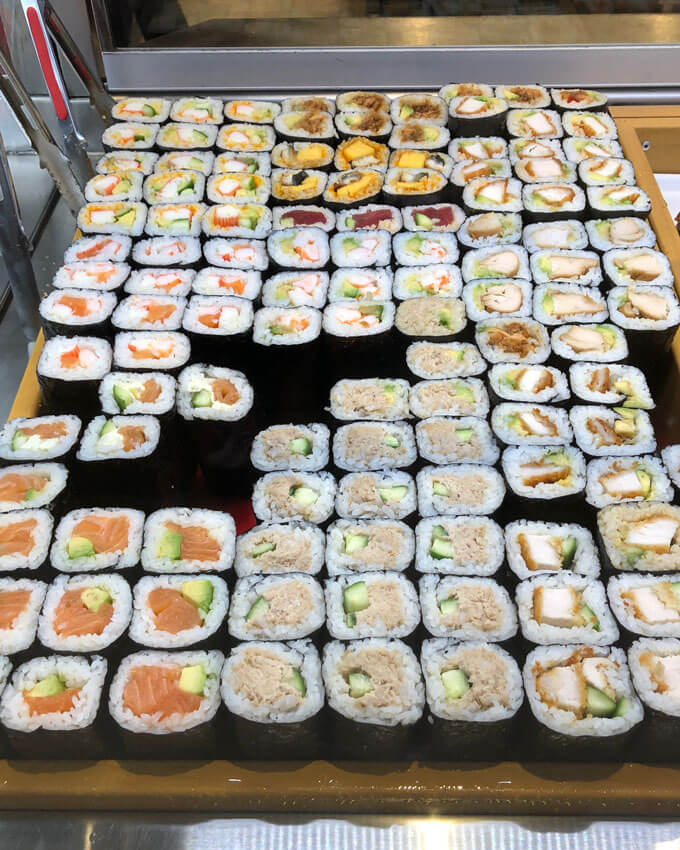
Display at a take away sushi shop.
To make sushi rolls like those at take away sushi shops like the photo above, you will need:
- Sushi rice – cooked rice + sushi vinegar (mixture of rice wine vinegar, sugar and salt).
- Nori sheets – roasted seaweed sheets.
- Ingredients to go in the centre of each roll – see the next section.
- Bamboo sushi mat (bamboo rolling mat) – you can find more details about this, including photos in my post Sushi Rolls (Norimaki).
- A bowl of water with a small amount of vinegar – to wet your hands so that rice grains won’t stick to them.
- A kitchen knife – to cut sushi rolls.
- A wet kitchen towel – to wipe the kitchen knife before cutting a sushi roll.
About Sushi Rice and Nori Sheet (Roasted Seaweed Sheet)
In Australia, you can buy Sunrise brand of short grain rice labelled as ‘Sushi Rice’ at super markets. But if possible, try Japanese rice species called ‘Sasanishiki‘ (ササニシキ or ささにしき) which is best suited for sushi. The left photo below is 5kg/11lb of the Sasanishiki rice that I bought from a Japanese grocery store.
Sasanishiki rice is less glutenous than other species such as Koshihikari rice (Sunrise Sushi rice is Koshihikari rice) so the sushi rice does not become sticky when sushi vinegar is mixed. Japanese Grocery store sells it. You could also try Rakuten Global Market or possibly Amazon.
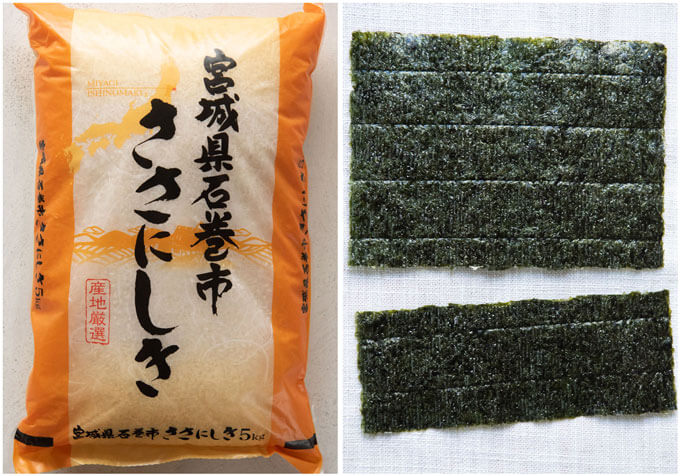
The size of the standard nori sheet is 19cm/7½” wide and 21cm/8¼” long. But to make a Take Away Sushi Roll, you only need ⅔ of the full-size length – 19cm x 14cm/7½” x 5½” (top part of the nori in the right photo above). This is a nuisance because you will end up with many narrow strips of nori.
But you can make short sushi out of them if you like or use them later for Onigiri. Alternatively, cut them in half and use as a topping for Ramen or cut them into short thin strips and sprinkle on Maguro no Zuke-don or Zaru Soba.
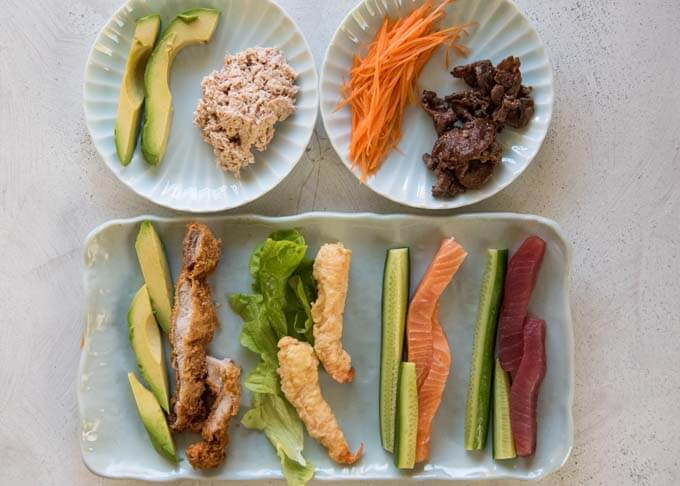
What’s in the middle of Take Away Sushi Rolls
One of the reasons why Take Away Sushi Rolls are popular is that the fillings of the rolls can be almost anything and you can eat sushi without raw fish in it.
If you look at the display of sushi rolls at take away sushi shops, you will notice that they can be prawn cutlets, teriyaki beef, chicken cutlet, canned tuna with mayonnaise, etc., in addition to traditional raw fish sushi rolls.
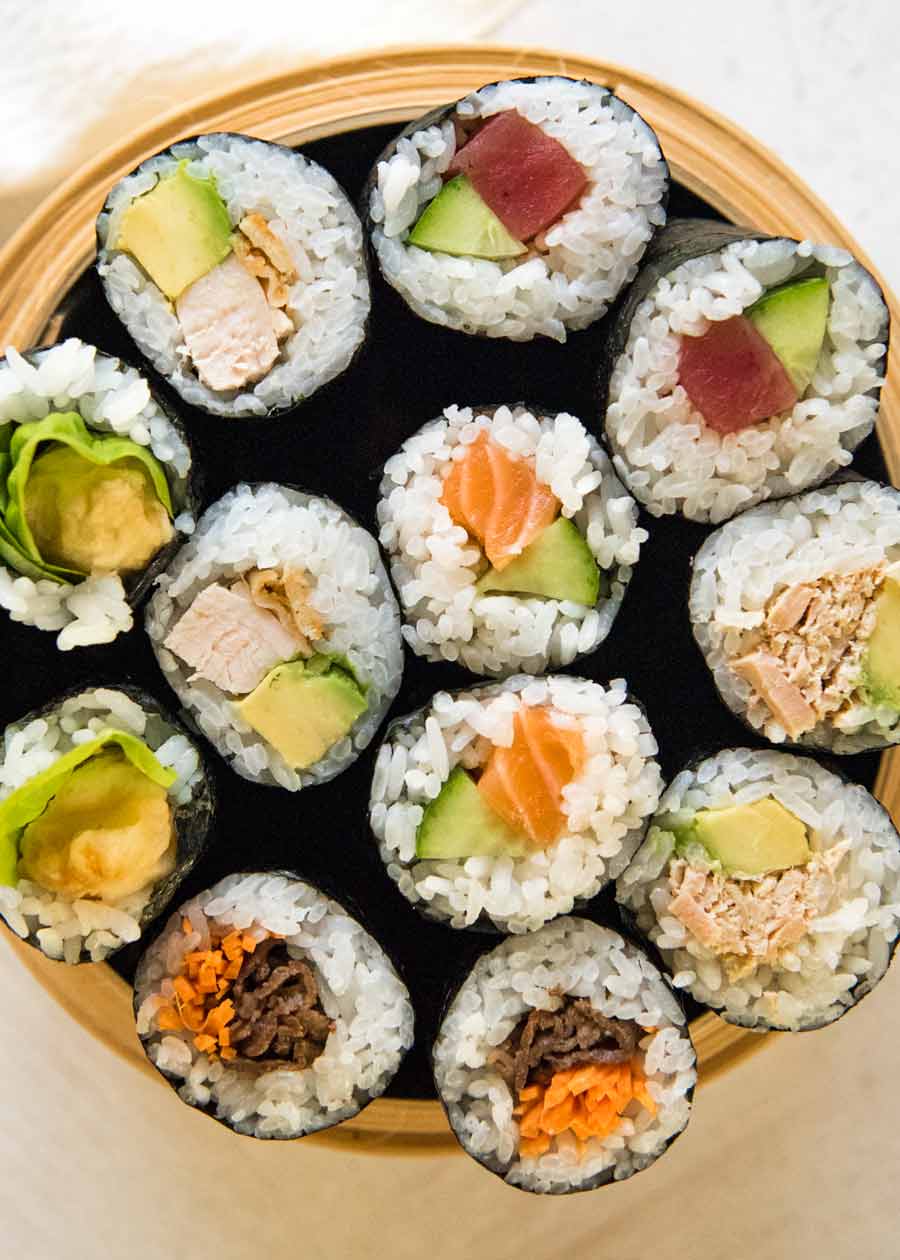
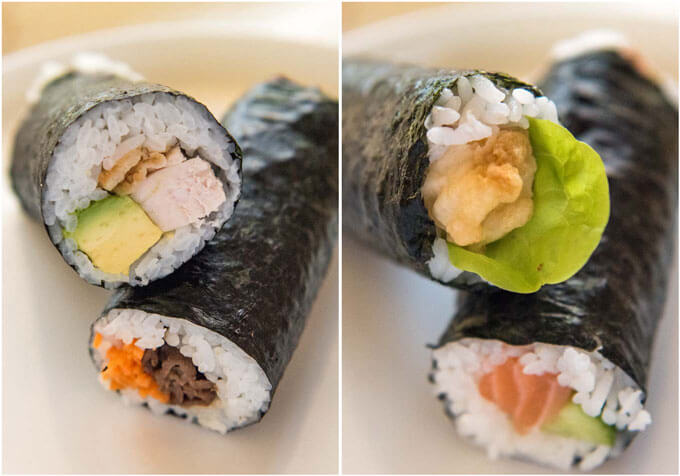
In my Take Away Sushi Rolls recipe, I included the following sushi rolls:
(From bottom right clockwise)
- Raw Tuna & cucumber
- Raw Salmon & cucumber
- Tempura prawn & green leaf
- Chicken cutlet & avocado
- Tuna dressed in mayonnaise & avocado
- Beef teriyaki & julienned carrots
Apart from the raw fish, you can prepare the main fillings ahead of time, even the day before. You can of course use many other combinations of fillings such as:
- Salmon & avocado
- Teriyaki chicken & cucumber
- Cooked prawns & blanched asparagus
- Dashimaki Tamago (Japanese Rolled Omelette) & cucumber
- Vegetarian fillings with julienned cucumber, carrot and avocado
What you should avoid though are saucy or very oily ingredients.
One Take Away Sushi Roll contains about 60-70g/2.1-2.5oz of sushi rice. In theory, a couple of rolls should fill you up (maybe 3 for me). You can reduce the amount of rice and increase the ingredients in the centre, but when you cut the roll it just doesn’t look good. I think the balance of rice and ingredients needs to be right.
How to Roll Take Away Sushi Rolls
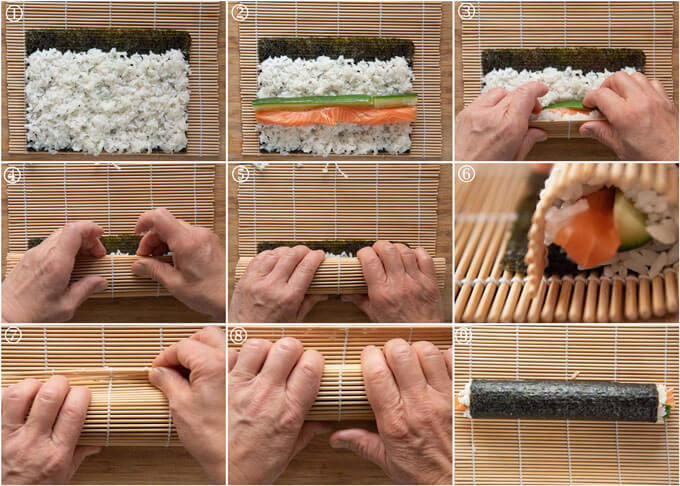
The rolling technique is fundamentally the same as the way I showed you in my post Sushi Rolls (Norimaki). But here is the step-by-step photo to make a Take Away Sushi Roll.
There are a few tips to successfully making a roll:
- Place a nori sheet aligned to the edge of the rolling mat closest to you. (The standard method is to place a nori sheet 2-3cm/1″ away from the edge of the mat. But I find that for beginners, my method makes it easier to complete the last point below.)
- Evenly spread the rice.
- Spread the fillings in the centre of the rice area, not along the edge.
- Stop when the end of the nori sheet closest to you reaches to the other end of the rice, and ensure that the nori sheet is slightly tucked in.
The last point is quite important. If you don’t check it and keep on rolling, you could end up with the end of the nori not nicely rolled in and rice bursting out from the seam line.
Take away sushi shops are everywhere in Sydney these days and they are very popular. I sometimes buy them to just keep my stomach quiet but I always regret it. They press down the rice quite a lot so the rice grains are not fluffy and the vinegar flavour is sometimes almost non-existent.
You will be amazed at how good these Take Away Sushi Rolls taste when you make them at home.
Yumiko![]()
P.S. Don’t forget to see the section ‘MEAL IDEAS’ below the recipe card! It gives you a list of dishes that I have already posted and the new recipe in this post that can make up a complete meal. I hope it is of help to you.
Today's sushi rolls are just like the those you buy from take away sushi shops. It’s not very difficult once you’ve prepared the ingredients to go in the middle. Here is how to make Take Away Sushi Rolls step-by-step.
This is a long recipe only because I included very detailed step-by-step instuctions for rolling a ssushi as well as instruction for preparing 6 different fillings.
Prep Time and Cook Time are based on making 6 rolls with Beef Teriyaki & Julienned Carrots. Time to cook rice is not included.
- 3 x 19cm/7½” wide 14cm/5½” long nori sheets (note 1)
- 2½ cups hot cooked rice (note 2)
- 35ml/1.2oz rice wine vinegar
- 2 tsp sugar
- ⅛ tsp salt
- 3 strips sashimi salmon , 19cm/7½” long, 1.5cm/⅝" wide (about 50g each, note 3)
- 3 x 19cm/7½” long wedges of cucumber (note 4)
- 3 strips sashimi tuna , 19cm/7½” long, 1.5cm/⅝" wide (about 50g/1.8oz each, note 3)
- 3 x 19cm/7½” long wedges of cucumber (note 4)
- 4 - 6 x 1.5cm/⅝" wide strips of chicken cutlet (about 150g/5.3oz in total, note 5)
- 9 slices avocado , sliced lengthwise to 1cm/⅜" thick
- 150g/5.3oz canned tuna flakes or chunks in brine or spring water
- 3 tbsp Kewpie mayonnaise
- salt and pepper
- 6 large prawn tempura (about 10cm/4" long, note 6)
- 6 small green soft-leaf lettuce leaves (note 7)
- 150g/5.3oz very thinly sliced beef (note 8)
- 1 tbsp oil
- 2 tsp each soy sauce , sake, mirin
- ½ tsp of sugar
- 75g/2.6oz carrot , finely julienned
- A small bowl of water mixed with 1 tablespoon of vinegar
- A sushi rolling mat/bamboo rolling mat
-
Add rice wine vinegar, sugar and salt in a jar or a bowl. Mix well until sugar and salt are dissolved.
-
Add half of the vinegar mixture to the rice, spreading evenly and mix well using a spatula in cutting motion so that the rice grains do not break or get squashed.
-
Add the remaining vinegar mixture and mix well in the same way. If you can, fan the rice to cool it down quickly to let the moisture evaporate faster.
-
Place a nori sheet, smooth side down on a sushi rolling mat, aligning the cut end of the edge to the end of the mat closest to you.
-
Wet your hands with the vinegar water in the bowl, take ⅓ of the sushi rice and make an oval ball. Place the rice in the centre of the nori sheet and spread the rice in all directions, leaving a 2cm border on the side furthest from you (step-by-step photo
① ). Ensure that the rice evenly covers the nori sheet and do not press the rice down too hard.. -
Place your choice of fillings onto the nori sheet, as per the sections below (step-by-step photo
② ). -
Using the thumb and index finger of both hands, hold the end of the mat and lift it up. Then place your middle fingers and ring fingers on the fillings firmly (step-by-step photo
③ ). While placing these fingers on the fillings, roll the bamboo mat away from you (step-by-step photo④ ). -
When the edge of the nori is at the top, let go of your middle and ring fingers and keep rolling slowly until the edge of the nori reaches the other end of the rice (step-by-step photo
⑤ ). -
By now, the mat should be completely covering the sushi roll (step-by-step photo
⑥ ). Don't roll the end of the mat into the rice! Press the rolling mat around the sushi roll gently but firmly. -
Hold the roll by placing one hand over the mat, then pull the end of the mat with the other hand a few centimetres away from yousothat the sushi inside the mat rolls a further 90 degrees or so (step-by-step photo
⑦ ), overlapping with the end of the seaweed sheet that does not have rice on it. -
Using both hands, gently but firmly press the mat over the sushi roll (step-by-step photo
⑧ ), then remove the mat (note 9). -
Place the sushi roll on the plate/cutting board with the overlapping seaweed line down.
-
Leave the roll for a couple of minutes to let the seam stick.
-
Wipe a sharp kitchen knife with a wet towel to give moisture to the knife. This will prevent the knife from sticking to the rice, resulting in a clean cut.
-
Cut the roll in half.
-
Place a fish strip and a cucumber wedge together in the middle of the rice horizontally.
-
Line up 2-3 slices of chicken cutlet connected to each other horizontally in the middle of the rice.
-
Place 3 avocado slices, breaking in the middle of the arch if the arch is too high so that the avocado piece can be placed along with the chicken.
-
Put tuna in a bowl. If it came in chunky pieces, break them into flakes using a fork.
-
Add mayonnaise and mix well. Season with salt and pepper.
-
Spread ⅓ of the tuna mixture in the middle of the rice horizontally, making a narrow mound.
-
Place 3 avocado slices, breaking in the middle of the arch if the arch is too high so that the avocado piece can be placed along with the tuna.
-
Line two green leaves connected together to cover the centre of the rice horizontally.
-
Place two tempura prawns, tail ends in the middle and overlapping slightly, on the green leaves.
-
Add oil to a frying pan over medium high heat.
-
Add beef slices and sauté until slightly browned and beef is nearly cooked through for about 1-2 minutes depending on the thickness of the slices.
-
Add soy sauce, sake, mirin and sugar to the pan and mix with the beef. When the sauce is nearly evaporated, transfer the beef slices frim the heat and cool them down.
-
Spread ⅓ of the beef in the middle of the rice horizontally, making a narrow mound.
-
Spread ⅓ of the carrots along the beef.
1. A standard nori sheet (roasted seaweed sheet) is 19cm/7½” wide 21cm/8¼” long. You need to trim 1/3 off the sheet to make a 19cm/7½” x 14cm/5½” sheet. Please see my post about how to utilise trimmed nori pieces.
2. You need to use sushi rice, short grain rice or medium grain rice (order of preference). If possible, try to use Japanese brand of rice as they are shiner, fluffier and tastier. Other grains are not suited for sushi.
Please refer to How to Cook Rice the Japanese Way but add 1 sheet of 10cm x 5cm/4" x 2" konbu (kelp) when cooking the rice if you can. This will add umami to the rice.
3. It is OK to have 2-3 short strips to make it 19cm long. If the edges of the strips are narrower, make the strips slightly longer so that two strips can be overlapped when placed on the rice.
4. Cut a cucumber vertically into 6-8 long wedges (depending on the thickness of the cucumber) to make strips. If you can find a long cucumber, great. If your cucumber is short like mine, make more strips to make up to the required length.
5. Please refer to the Chicken Cutlets section of my Katsu Curry recipe.
6. Please refer to my post Tempura. If your prawns are smaller, use more prawns to make up to the total length of 19cm/7½”.
7. Oak leaf lettuce or butter lettuce suits best.
8. Any cut other than a stewing cut will be fine. I used sukiyaki/shabu-shabu slices as they cook fast.
9. (Optional) If the rice at the end of the roll is uneven, cover the roll with the rolling mat, aligning the edge of the mat to the end of the roll. Hold the mat on one hand and using the other hand, press the end of the roll inwards to tidy up.
If you want, you can trim the fillings that are sticking out to make it neater.
10. You can make tempura prawns, chicken cutlet, tuna with mayo and beef teriyaki the day before. But sushi rice must be made on the day. The sushi rice stored in the fridge is not great to roll sushi.
11. Nutrition per salmon and cucumber roll. Some fillings will have higher calories.
serving: 111g calories: 145kcal fat: 3.6g (6%) saturated fat: 0.8g (4%) trans fat: 0g polyunsaturated fat: 1g monounsaturated fat: 1g cholesterol: 14mg (5%) sodium: 28mg (1%) potassium: 135mg (4%) carbohydrates: 20g (7%) dietary fibre: 0.3g (1%) sugar: 1.7g protein: 7g vitamin a: 2.1% vitamin c: 2.8% calcium: 0.9% iron: 5.1%
Meal Ideas
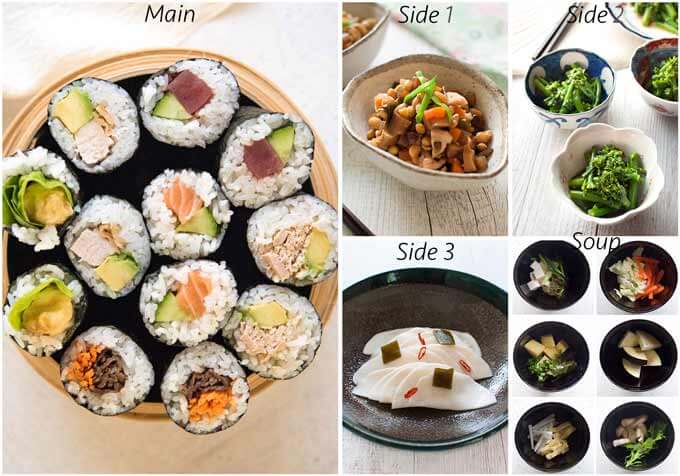
A typical Japanese meal consists of a main dish, a couple of side dishes, a soup and rice. I try to come up with a combination of dishes with a variety of flavours, colours, textures and make-ahead dishes.
Today’s recipe covers Main and Rice, so I filled the photo panel where the rice usually goes with an additional small dish. There is not a large amount of protein in the sushi rolls, so I picked Gomoku-mame to supplement with soy protein. If you prefer animal protein, I would suggest that you replace it with a small amount of grilled fish.
I picked Broccolini Karachi-ae and Pickled Turnip to go with Take Away Sushi Rolls to add different flavours to the meal. Instead of miso soup, your Soup can be a clear soup such as Dried Tofu Skin Soup or Japanese-style Egg Drop Soup (Kakitama-jiru) if you prefer.
- Main: Take Away Sushi Rolls – today’s recipe, some fillings can be made ahead
- Side dish 1: Gomoku-mame (Simmered Soybeans with Vegetables) – make ahead
- Side dish 2: Broccolini Karashi-ae (Mustard Dressing)
- Side dish 3: Pickled Turnip (Senmai-zuke) – make ahead
- Soup: Miso Soup of your choice from Miso Soup Ingredient Combinations or your favourite ingredients
I’s simple and fun to roll.thank you and good luck with the sushi roll making!
Hi Ron, yes, it is fun, isn’t it?
Hi Yumiko, I just read that rice made ahead of time and refrigerated won’t work. I want to make these for school lunches but making fresh rice before school is not going to happen! 😂
What happens if you use refrigerated rice? Thanks Kathy
Hi Kathy, you can cook rice the day before. But before mixing the sushi vinegar to make sushi rice, you’d need to warm up the rice. Cold rice does not absorb the vinegar well. Also, cold sushi rice do not roll sushi very well because the rice does loses stickiness.
Easy to follow recipe. Nice easy lunch that my family of 5 all enjoyed. Thanks
Hi Lisa, wonderful! Making the sushi rolls is fun, right?
I made these for dinner tonight as sushi is my 5 year olds favourite food. I used Nagi’s teriyaki sauce recipe for the chicken and added a little Kewpie mayo and toasted sesame. And I also made prawn and avocado as well. I had to make 2 lots as they were so delicious, my husband got into them early!
Hi Miranda, you made two great combinations of sushi roll!
Yumiko,
Thank you so very, very much for this great recipe and lesson on how to make sushi!!! I love sushi, but was not sure about trying to make it myself. I have looked at many recipe sites, but yours is the best. Your instructions are made easy to understand & I love the pictures you included!
Hi Patti, thank you! I don’t have videos for most recipes so I try to include step-by-step photos where appropriate. I am glad that it’s helpful. Good luck with sushi making!
Wonderful tutorial and ideas. Can’t wait to make it again soon.
Hi Sue, thanks a lot. Please let me know how it went.
Thanks for this recipe Yumiko. I used to make sushi rolls at home a lot, then stopped bc something went a bit awry (like my quiches!). I made these last night; your recipe gave me the few tweaks I needed on what I was doing. Loved them! My daughter came down the stairs and said “what’s that yummy smell?” – we both love the smell of nori and rice. 🙂 I make them with brown rice too.
I am, however, slightly stuck on rolling right at around photo 6. I always roll, then stop before the mat goes into the sushi roll, readjust it slightly by rolling the sushi roll with my hand just until it’s “sealed”, then put the mat back over and keep going. I’m sure that’s not quite right?
Thank you again.
5-star rating
Thank you!
Hi Samantha, I’m glad that my recipe was of help to you. The way you re-adjust the roll with hand, is not quite the usual way of rolling. At the photo number 6, make sure that the end of the mat is almost tucked inwards, then lift the end of the mat with your thumb and index finger slightly while holding the roll over the mat on the other hand, then pull the end of the mat away from you a bit more, still holding the roll with the other hand. It should seal the roll with the seam line at the bottom. The the action in bold above is the key so that the next action can close the seam properly.
Thank you Yumiko. I have just practised that at my desk (“air practising”!). I will try! 🙂
Good girl!
I just love sushi and so does my daughter and granddaughter so will have to have a go at making these very soon. Thanks for the great recipes and tips. You and Nagi do such a great job of explaining things in detail making it easy to follow.
Hi Coral, thank you and good luck with the sushi roll making! I’s not difficult and fun to roll.
Will make these for my daughter – she has been in love with Japanese food since her first visit as a school girl.
Hi Ann, please do and let me know how it goes.
Mum! I’m so excited about this one, I’ve been waiting for it. Thanks!!
Hi Nagi, I am glad that I finally published this recipe. I made so many of them for this post but didn’t mind it at all. As you know I can eat sushi every day, even for the breakfast.