Here is a super easy dish to serve as a main, side or an addition to your antipasto platter. Salt Chicken Rolls has intense chicken flavour and is served cold or at room temperature. It keeps well in the fridge as well as frozen.
I rarely use a microwave to cook food. My use of the microwave is limited to reheating leftover meals and occasionally steaming vegetables (you can find microwave-steamed bean sprouts in my post Sesame Bean Sprouts). But today’s chicken dish is cooked just in the microwave.
What is required to make Salt Chicken Rolls
The recipe is split into two stages. The first stage is seasoning the chicken and the second stage is cooking the chicken in the flavoured stock. The recipe calls for 2 fillets of chicken leg.
Season the Chicken:
- 2 fillets of whole chicken leg (chicken Maryland, i.e. thigh & drumstick connected) or a few thigh fillets, skin on.
- 1 tbsp cooking sake.
- 1 tsp each sugar and salt.
My Maryland fillet was about 270g / 0.6lb each. If you are using thigh fillets, try to find a few fillets weighing 500-600g / 1.1-1.3lb in total.
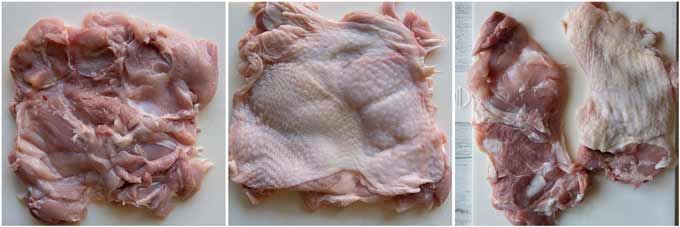
Chicken Maryland fillet (left & middle) and thigh fillets (right).
Having the skin on the fillet is important as the good flavour of the chicken is locked inside the skin while cooking. The chicken also retains moisture better.
You can use breast fillet if you prefer but the cooked chicken rolls are slightly drier than the one made with leg/thigh fillet. They are still tasty, though!
Flavoured Stock:
- 200ml / 6.8oz water
- 1 tbsp cooking sake
- A piece of konbu (10cm x 10xm / 4″ x 4″)
- 1 tsp salt
How to make Salt chicken Rolls
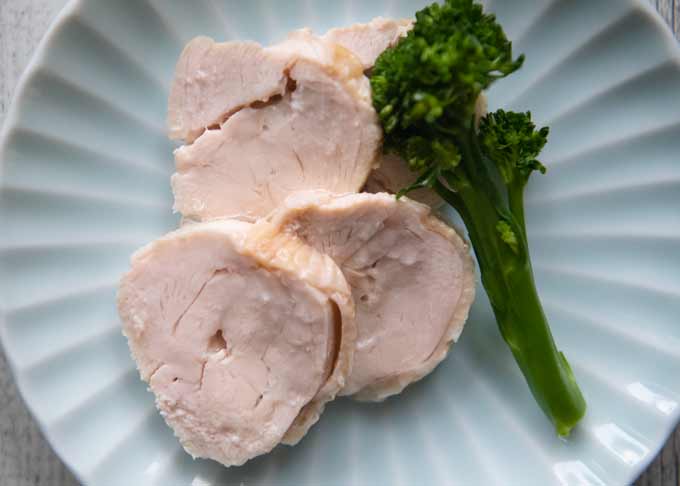
Salt Chicken Rolls made with a chicken breast fillet.
Here are the high-level steps to make Salt Chicken Rolls (none of the steps require special skills):
- Season the chicken fillets.
- Roll the fillets and secure the rolls.
- Mix stock ingredients.
- Microwave the chicken rolls in the stock for about 10 minutes.
- Marinate overnight.
Before seasoning, poke the chicken skin using a fork or the tip of a knife to let the seasoning penetrate the flesh. Leave the seasoned chicken for 10 minutes.
The cooking time can vary slightly depending on the size of the fillet. Poke the centre of the roll with a bamboo skewer and if clear juice comes out, it is done.
Making Chicken Rolls
You make a roll with each fillet, securing the roll using a string or toothpicks. Although, if you have a small elastic roasting net, that would be easier.
If the meat is a large block like a roasting meat, you can tie the meat with a long string in a professional way like the one in my Yakibuta recipe. But the chicken roll is thin and the fillet is a bit slimy, so I tied the roll individually in several places.
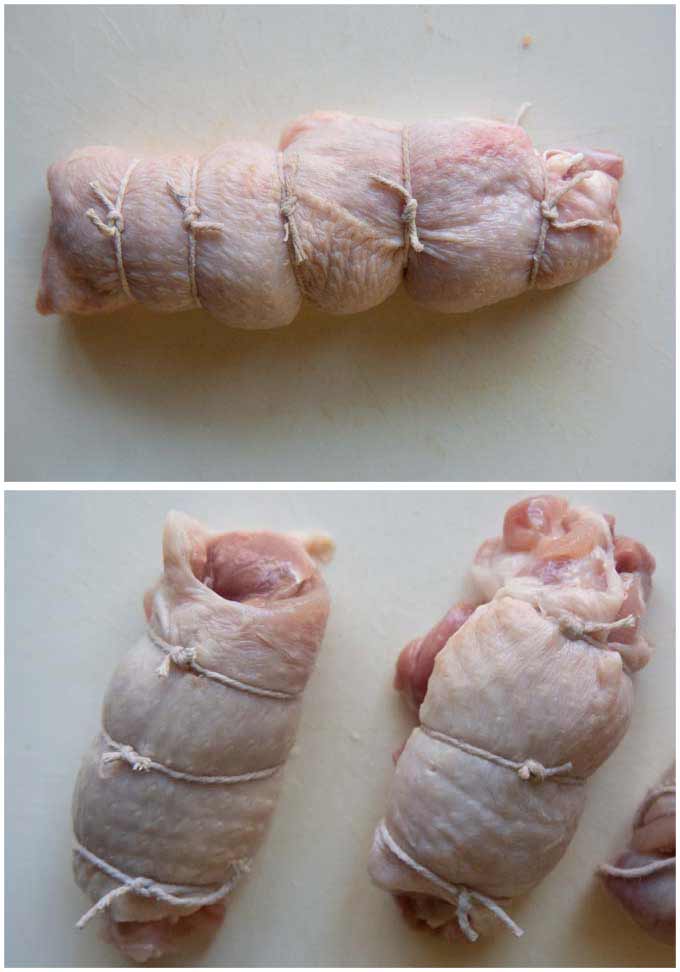
Depending on the type of fillet you use, the length of the chicken roll can vary and the number of ties you need will be different. I mad 5 ties for a chicken Maryland fillet, 3 ties for a thigh fillet (see above photos).
You don’t have to neatly tie the roll. You can even put the string around randomly. As long as the roll is secure, that’s all that matters.
Cooking and Marinating Chicken Rolls
It is good to use a microwave-safe container that the chicken rolls can just fit inside. The container needs to be deep because the stock will bubble while cooking.
Cover the container loosely with cling wrap or a lid. Cook on high in the microwave for 5 minutes, turn the rolls over and cook for a further 4 minutes. Let them cool.
If you are using a few thigh fillets, try to use similar sized fillets to achieve even heating in the microwave.
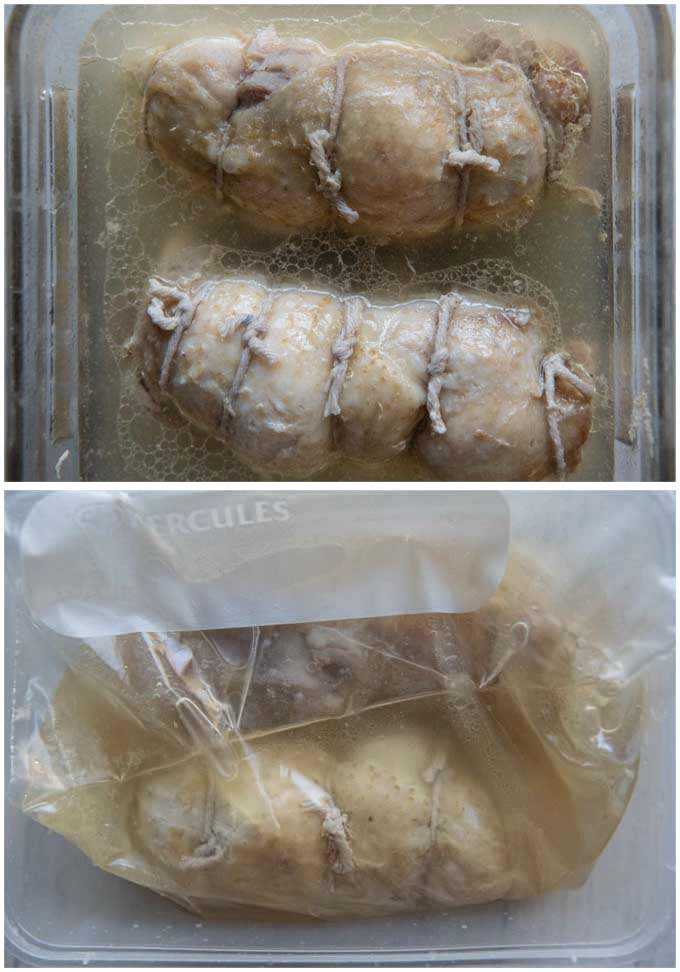
When the chicken rolls are cooled down, place them in a zip lock bag with the liquid.
I transfer the chicken rolls to the bag first. Then I put the stock through a sieve to get rid of any tiny chicken bits in the liquid before adding the liquid to the bag. Using a sieve is an extra step and not mandatory but it’s nice to have a clean stock.
Remove as much air as possible out of the bag and seal it. To remove air from the bag, I do the following:
- Fill the basin with water and lower the half-sealed zip lock bag into the water slowly.
- Gently massage the bottom of the bag, steering the air bubbles towards the surface.
- Gradually lower the bag to just below the zip line while eliminating the air bubbles.
- Once most air is out, seal the bag.
Place the bag in the fridge overnight.
Serving Salt Chicken Rolls
Take the chicken rolls out of the bag. The stock should be gelatinous and some of it might be stuck on the chicken. Remove it as much as possible.
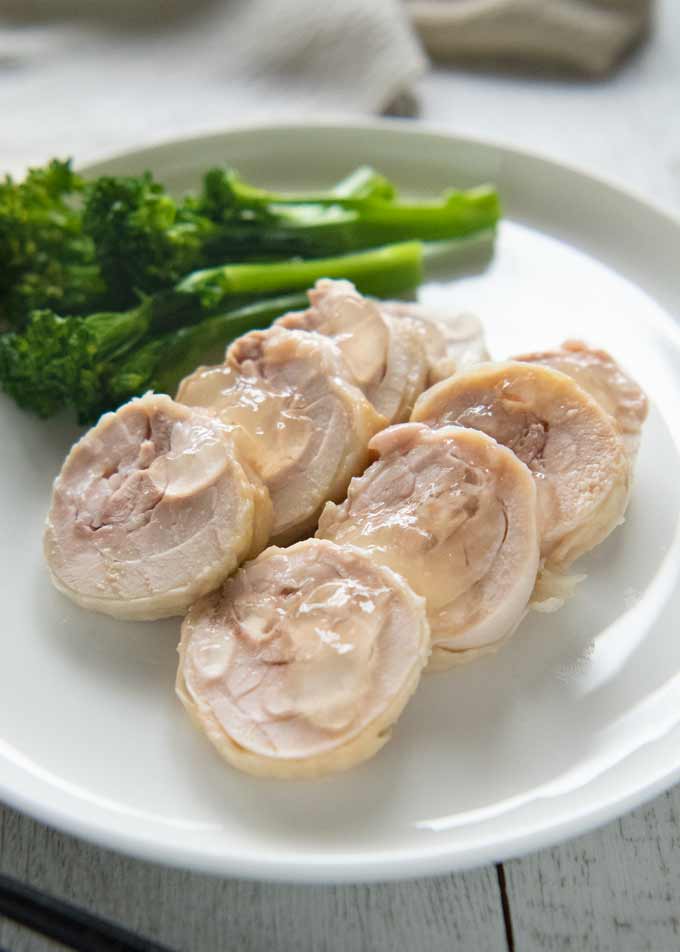
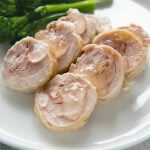
Place the rolls on a cutting board and remove the strings (or toothpicks). Slice each chicken roll thinly (I sliced it 5mm / 3⁄16″ thick). The best way to serve the chicken roll slices is to spread them out so they slightly overlap.
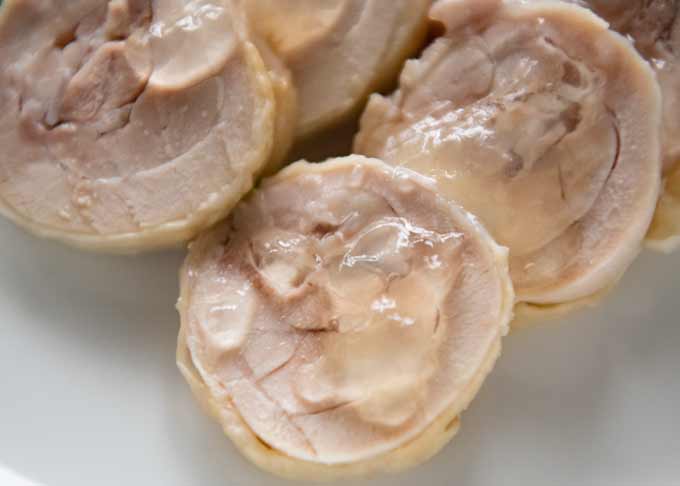
You don’t need to slice the roll. If you prefer, you can dice it but I think that slicing is the best way to show off the roll.
The gelatinous stock is packed full of flavour and you don’t want to waste it. I put some of it over the chicken slices to decorate them as well as to give an extra flavour to the dish.
Salt Chicken Rolls are Versatile
Because the chicken has only a plain salty flavour, you can use it for many dishes:
- Make a thinly sliced Salt Chicken Rolls and cucumber sandwich.
- Add the sliced chicken to your fresh green salad.
- Instead of char siu or charshu slices, use sliced Salt Chicken Rolls as toppings.
- Serve them along with other foods on an antipasto platter.
- Serve them with cold noodles such as Zaru Soba and Somen.
- Use it in aemono.
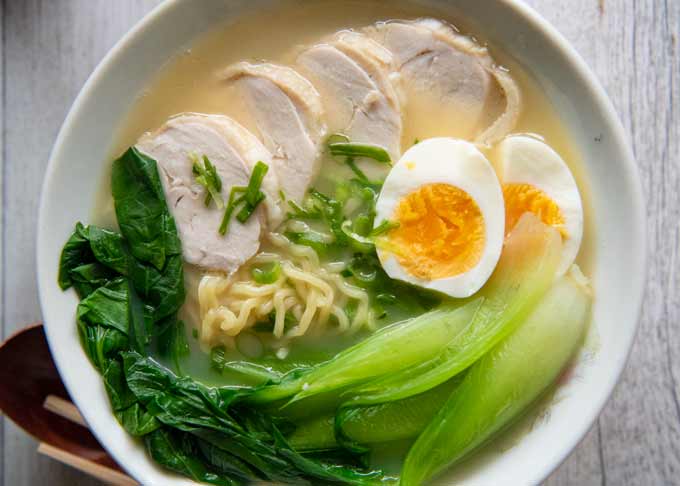
Here is a photo of my Chicken Paitan Ramen (recipe is coming soon!) with Salt Chicken Rolls on top.
Salt Chicken Rolls keep in the fridge for 4-5 days and a few weeks in the freezer. It’s a perfect dish for a bento box too.
What other dishes can you come up with?
Yumiko![]()
It is super easy to make but has intensive chicken flavour, Simple Salt chicken Rolls are great as a main dish, an addition to the antipasto platter, a sandwich filling, etc. It keeps well in the fridge as well as frozen.
Prep Time includes the time to leave the chicken after seasoning. I allowed 10 hours for Marinate Time but you can marinate up to 24 hours.
Don't forget to see the section 'MEAL IDEAS' below the recipe card! It gives you a list of dishes that I have already posted and this recipe so you can make up a complete meal. I hope it is of help to you.
- 2 large fillet of chicken leg (maryland) skin on (note 1)
- 1 tsp salt
- 1 tsp sugar
- 1 tbsp cooking sake
- Blanched broccolini
-
Butterfly the chicken fillets (note 4) where the meat is very thick so that the thickness of the fillet becomes even. Using a fork or the tip of a knife, poke the skin in several places.
-
Sprinkle salt, sugar and sake over the fillets and massage ensuring that seasonings are rubbed into the flesh. Then, leave the chicken for 10 minutes.
-
Place the fillet horizontally, skin side down on a work bench. Starting from the end closest to you, roll the fillet away from you. User strings to tie several places to secure the roll (note 5).
-
Roll another fillet in the same way.
-
Put the Flavoured Stock ingredients except konbu in a microwave-proof container (note 6) and mix well. Add konbu, then place the chicken rolls in the container. If the container comes with a lid, place the lid on loosely, otherwise, cover the container with cling wrap (note 6).
-
Cook for 5 minutes in the microwave on high. Turn the rolls over and cook further 4 minutes with the lid on.
-
Remove the konbu. Let it cool naturally, then transfer the chicken to a zip lock bag.
-
Put the stock through a sieve to eliminate chicken bits (optional) and transfer to the bag.
-
Remove the air from the bag as much as possible (note 7), then seal the bag. Marinate in the fridge overnight (10-24 hours).
-
Take the chicken out of the bag, removing gelatinous stock off the chicken. Cut the strings off and discard them.
-
Slice each chicken roll thinly to 5mm / 3⁄16" thick (note 8). Place the slices, overlapping each other on a serving plate.
-
Place the broccolini on the side and put some gelatinous flavoured stock on the chicken slices.
1. My chicken leg fillet was 270g. Anywhere between 250-300g / 0.6-0.7lb is OK. If much larger volume, you need to adjust the quantity of other ingredients.
If you cannot find chicken leg fillet, use 2-3 thigh fillets to make up for the total weight. You could use a breast fillet but you will find that the cooked chicken is on the dry side.
2. If you have konbu dashi at hand, use it in place of water and a piece of konbu.
3. Instead of broccolini, you can of course use other vegetables. I think that blanched vegetables would suit best.
4. See my post Chicken Cutlet that explains how to butterfly chicken fillet.
5. I tied 4-5 places but if you are using smaller pieces, you probably need 3 ties to secure the roll.
Instead of using strings, you can secure the rolls with toothpicks. Put through the toothpicks near the end of the roll. You will need several toothpicks.
6. You need a container with enough depth as the liquid will bubble while cooking. It is also good to have a deep container if you are using cling wrap to cover so that the cling wrap does not touch the chicken while cooking. When the food touches the cling wrap while cooking in the microwave, it could melt the cling wrap.
7. Please see the section, HOW TO MAKE SALT CHICKEN ROLLS, which explains how I do it.
8. To serve as a main dish or nibbles, I think that 5mm / 3⁄16" is the appropriate thickness but it’s up to you. If thicker, the dish looks more dynamic and less elegant. But if too thin, it will not be practical to pick up the slice, particularly serving as nibbles.
For better presentation, you may want trim the both ends of the chicken roll. Don’t discard them, just pop them into your mouth - chef's privilege!
9. Salt Chicken Rolls keep in the fridge for 5 days and few weeks in the freezer.
10: Nutrition per serving. It is assumed that 50% of salt and sugar, 80% of water are left in the stock.
serving: 152g calories: 305kcal fat: 21g (32%) saturated fat: 6g (30%) trans fat: 0.0g polyunsaturated fat: 4.5g monounsaturated fat: 8.6g cholesterol: 116mg (39%) sodium: 681mg (28%) potassium: 268mg (8%) carbohydrates: 2.8g (1%) dietary fibre: 0g (0%) sugar: 2.2g protein: 23g vitamin a: 23% vitamin c: 5.5% calcium: 1.4% iron: 11%
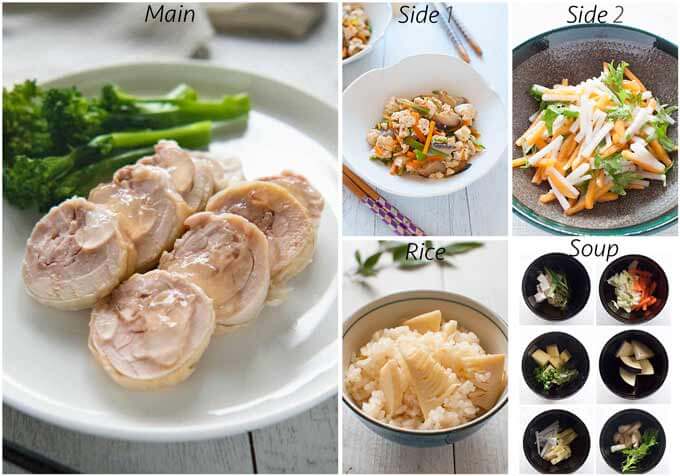
Meal Ideas
A typical Japanese meal consists of a main dish, a couple of side dishes, a soup and rice. I try to come up with a combination of dishes with a variety of flavours, colours, textures and make-ahead dishes.
The amount of protein in today’s main dish is not large so I picked Iri Dofu to supplement protein. Rice can be a plain cooked rice, but I thought takikomi gohan would make the meal more interesting.
Salt chicken, slight sweetness from Iri Dofu, sourness from the salad dressing and umami from all the dishes. Today’s menu idea will certainly satisfy your taste buds!
- Main: Salt Chicken Rolls – today’s recipe
- Side dish 1: Scrambled Tofu (Iri Dofu) – make ahead
- Side dish 2: Persimmon Daikon Salad – or other salad with vinegar-based dressing
- Soup: Miso Soup of your choice from Miso Soup Ingredient Combinations or your favourite ingredients
- Rice: Rice with Bamboo Shoots (Takenoko Gohan) – or cooked rice
Hi Yumiko, what can I substitute for konbu, or can I just leave it out?
Hi Karen, you can add a couple of pinches of granular dashi stock powder instea.
hello. this will be the first time Im trying your recipes , use Nagi often. in the instruction list. you did not mention the seasoning just tie with string so the seasoning is sprinkled on is it rubbed in ,,,,and can I poach microwave no way. where did ya get Idea to submerge zip lock bak to get air out ?? bin cooking for 70 years and a genius idea it is.
Hi Joseph, I missed one step to rub in the seasoning and leaving it for 10 minutes. This step should come after poking the skin of the chicken fillet. I just updated the recipe. Thank you very much for letting me know!
Yes, you can poach in microwave and the chicken flavour is intense this way, I think.
Du bist großartig, ich liebe deinen Blog und deine Rezept!!!
Grüße,
Jesse-Gabriel
Hi Jesse-Gabriel, Danke schön!
Hi Yumiko. This looks delicious. Could I cook it on the stove or the oven instead? Not so hot on microwave ovens… How long would it take? Thank you
Hi Dee, I can’t see why you cannot use a stove top to cook. I have not tried the stove cook method but I would think that you only need a bit longer to cook (turn it over once half way), with a lid on and leave it to naturally cool it down during which the chickens continue to cook.
Its a bit unusual to rate something without even making or tasteing. Rateing comes from a personal experience. Anyways, i luv chicken thighs, so always open to a new recipe, and this just sounds easy and delicious .. thank you 🥢 RMS
Hi Randy, it is super easy! Securing the roll is a bit tedious (if I must to pick on it) but it is worth it.
Hi Yumiko, Thank you for sharing, it looks delicious! One question: when rolling, does the skin get rolled inside somewhat, or do I keep the skin all on the outside? Thanks!
Hi Sara, naturally roll it with the skin intact. So, the skin gets rolled in. I hope you enjoy it!