Japanese Salmon (Salted Salmon) is one of the most consumed grilled fish in Japan. If you would like to taste the wonderful flavour of cooked salmon, grilled salted salmon is my recommendation. It is so easy to make at home and goes so well with rice.

I was astounded when I realised that I hadn’t posted a Japanese Salmon (Salted Salmon) recipe. I posted salmon dishes such as Teriyaki Salmon, Japanese Salmon Mirin-zuke, SaikyoYaki Fish. But the most fundamental fish for grilling, Salted Salmon was forgotten.
Salmon is a popular fish among Australians and the same applies to Japanese people. If you have travelled in Japan, you will notice that grilled salted salmon is served at breakfast as a set menu or in a bento box. It is also a popular filling for Onigiri (Japanese Rice Ball).
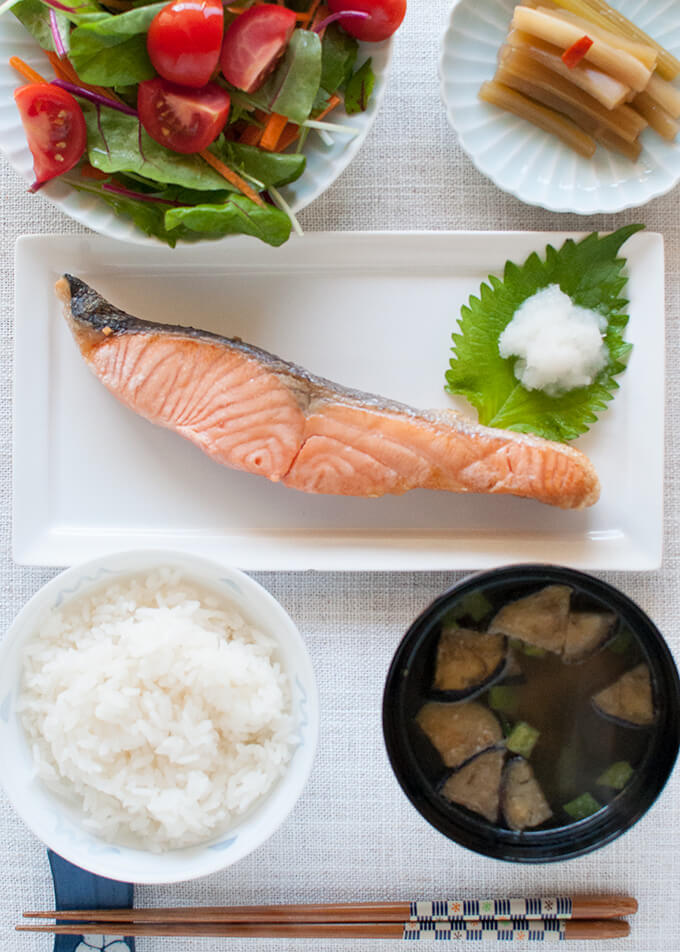
My breakfast, which looks just like a salmon teishoku (set menu).
Two forms of salted salmon
Salted salmon is called ‘shiozake’ or ‘shiojake’ (塩鮭) in Japanese. In Japan, you can buy sliced salted salmon fillets as well as whole salted salmon. But these salted salmon fillets are actually sliced at fish shops from the whole salted salmon.
Salting the whole salmon is a very old technique to preserve salmon that started in the 10thcentury. Although all sorts of whole fish can be salted, salted whole salmon has its own name, ‘aramaki’ (新巻or荒巻).
The word ‘aramaki’ used to be used even if the fish was not salmon, but these days ‘aramaki’ = salted whole salmon. Aramaki is still a popular food as a present in the traditional end-of-year gift-giving in Japan.
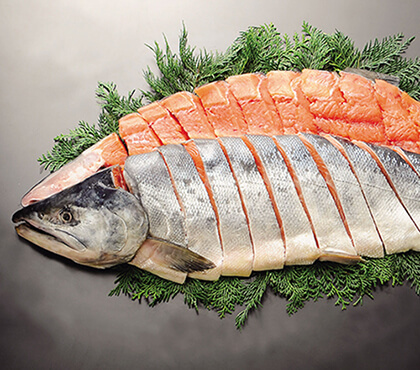
Salmon aramaki (whole salted salmon) sliced diagonally.
The whole salted salmon needs to be filleted into two sides, then each side is sliced into thin fillets. Japanese are used to eating fish with bones in, so they usually fillet one side with the backbone intact.
Also, the traditional way of slicing a side of salmon for grilling is to slice the fillet at an angle so that the surface of the flesh is maximised. Instead of cutting the salmon straight down like the Western style fillet, tilt the knife about 30 degrees and diagonally slice it.
I cannot buy salted salmon fillets in Australia and aramaki is out of the question. Luckily, salting salmon fillets is not difficult at all and you can freeze salted salmon fillets, too.
Salting Salmon at Home
Simply sprinkle salt over the fillets, wrap in paper towels and leave them in the fridge for a couple of days.
Most of the recipes out there on Japanese websites indicate that the ratio of salt to the weight of the salmon fillets is between 4-7%. I am conscious of the amount of salt in food, so I tried 4% salt to make salted salmon fillets. But, I found that it was still too salty for my liking and I reduced it to almost 3%. However, you might find that 4% salt is just right.
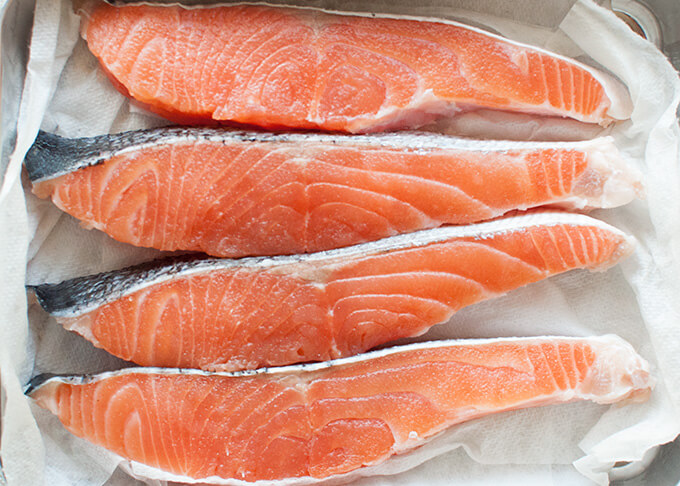
Before salting the salmon fillets, rinse and pat dry the fillets with paper towel. Then sprinkle salt all over the fillets, but try to put more salt on the skin than the flesh. Wrap the salted fillets with paper towel so that any excess moisture will be absorbed into the paper. Place it in an airtight container or on a tray wrapped with cling wrap, then refrigerate for 2 days.
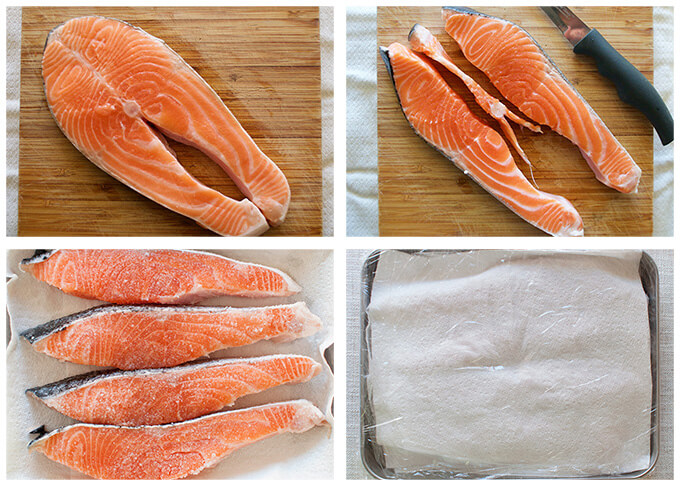
I made two salmon fillets from a cutlet (steak) by removing the backbone. See my post Japanese Salmon Mirin-zuke that shows how to make two fillets out of a cutlet. I did it because they look similar to the way Japanese people slice salted salmon. But you can simply buy salmon fillets instead (see the photo below with okra).
After 2 Days
The salmon is ready to cook. You don’t rinse salmon. If the surface of the salmon is wet, wipe the moisture off with paper towel.
If you are not cooking the salmon straight away, wrap each fillet in paper towel, then cling wrap and refrigerate up to 2-3 days. You can also freeze salted salmon. It is best to eat frozen salmon within 1 month but up to 3 months is OK. To freeze, wrap each fillet in cling wrap.
How to cook the salmon is really up to you. The most traditional way of cooking salmon in Japan is using a fish griller. But you can broil it in the oven, cook on the BBQ or a grill pan or even in a normal frying pan.
Depending on the thickness of the salmon fillet, the time required to cook varies. If you are using standard salmon fillet like the photo below, it might take touch longer to cook due to thickness of the fillet. But you should usually need to cook for a few minutes each side. After a few minutes of cooking, the edges of the fillet start burning, and the skin becomes crunchy.
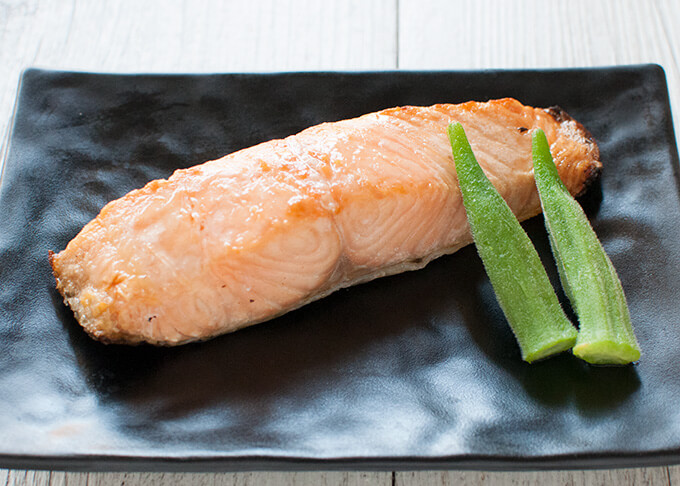
Grilled salted salmon made from standard salmon fillet served with a couple of boiled okra (ladies’ fingers).
In the above photo of grilled salted salmon fillet, I placed the skin side down but you can also place the skin side up to show off the crunchy skin.
If using frozen salted salmon, defrost in the fridge overnight before cooking.
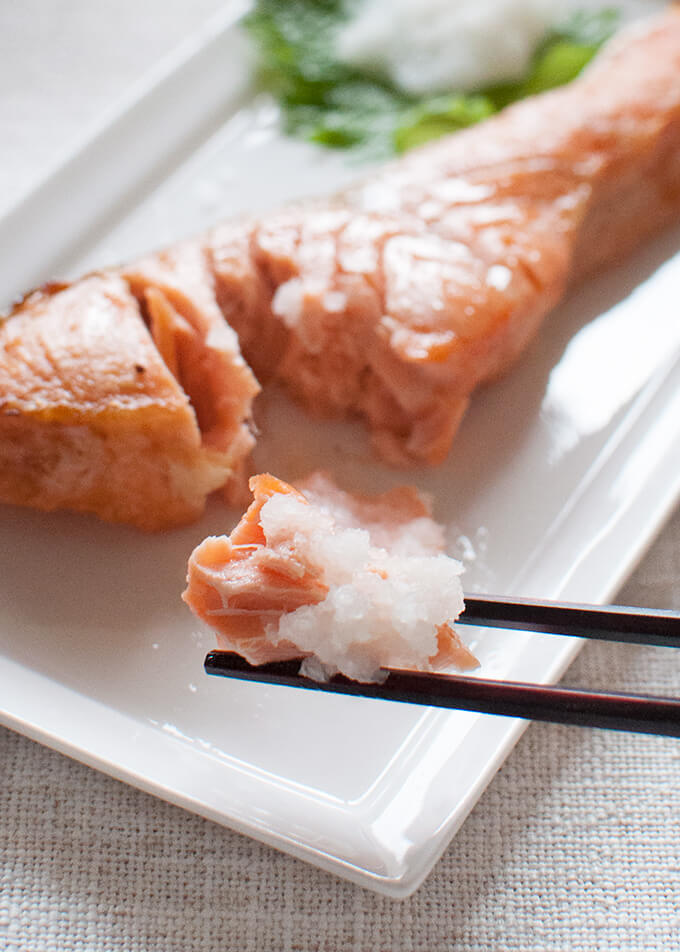
I often serve grilled salted salmon with grated daikon (white radish) as you can see in the first two photos. Grated daikon reduces saltiness of salmon. It also contains enzyme that helps digestion and ideal to match with oily meat or fish.
But you don’t have to have it and Japanese people often serve grilled salted salmon without garnish at home.
Yumiko![]()
At the end of the instructions, I also added how to cook salted salmon fillets. So Prep Time is to make salted salmon, Cook Time is to cook salmon.
- 350g (0.8lb) x2 salmon cutlets (steaks) to make 150g (0.3lb) x4 fillets (note 1)
- 20g (0.7oz) salt (normal salt, about 3-4% of salmon weight, note 2)
-
Remove the bone from each cutlet to make two fillets (Refer to Japanese Salmon Mirin-zuke to see how it is done).
-
Rinse the salmon fillets under cold water and pat dry with paper towel.
-
Sprinkle salt over the both sides of each fillet. Try to put more salt on the skin.
-
Line an airtight container or a tray with two layers of paper towel and place the salted fillets without overlapping on the paper towel.
-
Cover the surface of the fillets with two more layers of paper towel, tucking in the edges so that the fillets are wrapped in the paper towels completely and firmly.
-
Place the lid on airtight container or cover the tray with a sheet of cling wrap. Leave the container/tray in the fridge for 2 days.
-
If the surface of the fillets is wet, wipe excess moisture with paper towel. Now it is ready to broil, grill or freeze.
-
Adjust the rack so that the distance between the heat and the fish is about 10cm (4”).
-
If you have a metal grid with a tray, heat it under the broiler. Otherwise, preheat the broiler and also line a baking tray with a piece of scrunched aluminium foil (note 3).
-
Place salted salmon fillets on the grid or scrunched aluminium (note 4) and place the tray under the broiler. Leave the oven door open to avoid the fish being steamed.
-
Cook for about 3 minutes until the edges of the fillets start browning. Turn them over and cook further 2-3 minutes. (note 5)
-
Heat the griller with a small amount of oil over medium high heat.
-
Place the salmon fillets (note 4) and cook for about 2-3 minutes. Turn them over and cook further 2 minutes or so. (note 5)
-
After wiping the moisture away with paper towel, wrap each fillet tightly with cling wrap and freeze them straight away.
-
Cook after defrosting. To defrost, leave them in fridge to thaw slowly.
1. I used salmon cutlets because the shape of the salmon pieces made from a cutlet is similar to those you get in Japan. This will make 4 fillets of about 150g (5.3oz) each. But if you prefer, you can use salmon fillets instead.
2. The amount of salt required to make salted salmon is between 3-7% of the total weight of salmon to be salted. Japanese recipes tend to use about 5% salt, but I found that it was too salty for my liking. So, I used 3%+ of salt: 3% of 600g (1.3lb) salmon = 18g (0.6oz).
If you prefer a saltier flavour, you can increase the amount of salt, but I would recommend starting with 3-4%. And if you think more salt is required, you can increase the salt next time when you make it. If salmon is too salty, it's not good to eat but if there is not enough salt, you can always sprinkle on a bit of salt or soy sauce when eating.
The more salt you use, the better the salted salmon preserves.
3. Cut a large piece of aluminium foil, twice as long as the width of the tray. Gently scrunch the foil to just fit in the tray. This will prevent the fillets from sticking to the bottom of the tray.
4. When cooking salmon fillets with one side covered with skin, place the skin side down first if you are serving the salmon with crispy skin side up. Otherwise, cook the skin side first.
5. The time required to cook the salmon through depends on the thickness of the fillet. My salmon was 2cm thick.
Hello!!! I looked up this recipe out of curiosity; I’ve been wanting to do salmon on my smokeless grill for a while now, but I just discovered the wonderful TV series “Wakakozake”, and the first episode features Salted Grilled Salmon.. I can hardly wait to try this!!!
Hi GT, I just saw the trailer and it momentarily showed the grilled salted salmon. I hope you like it. I make quite a few and stock them up in the freezer so that I can eat it any time.
Yumiko,
Can this be made with salmon that has had the skin removed? All the stores here leave the scales on the salmon and it is a real pain to scale a salmon steak or fillet.
Thank you,
Lynne
Hi Lynne, I know the pain. Some fish shops are hopeless. My suggestion would be to make salted salmon with skin on and also cook it with skin on. Only after the salmon is grilled, remove the skin which should be easy to come off. The skin keeps the flakey salmon flesh intact. Marinating it without skin on might be OK, but the flesh breaks apart easily when you grill it. Before grilling, examine the flesh and remove any tiny scales on the flesh.
Thank you. Since I will be cooking it in a pan, not on the grill, I think I will try it both ways — I have pretty good luck with keeping the salmon together when I cook it without the skin.
Thank you so much for sharing such a detailed recipe! I loved salted salmon and I’m so glad that I found this recipe. Haven’t had chance to cook it yet but will definitely do!
Hi Carmen, enjoy grilled salmon!