Semi Dried Whiting Fillets are packed with umami. The flesh stays soft and moist when grilled. Drying is a great way to keep the fish longer in the fridge and to preserve good flavour when frozen.
There are many different ways of drying fish, but I only used two methods – drying them in the sun and drying them in the fridge. Yes, you can dry fish in the fridge and this is the method I used in today’s recipe.
I have made many kinds of dried fish dishes using different dry fish recipes. But Semi Dried Whiting Fillets is my favourite.
About Bunkaboshi
As opposed to making dried fish in the sun, drying fish using an artificial drying mechanism like cold air, is called ‘bunkaboshi’ (文化干し). The word ‘bunka’ (文化) means culture or the shortened version of ‘bunmeikaika’ (文明開化, civilisation and enlightenment). And the word ‘boshi’ (干し) means drying or dried.
The word ‘bunkaboshi’ was introduced in 1950 when a grocery shop wrapped a dried marinated fish in a piece of cellophane instead of a newspaper so that the customers could see what was inside.
It was given this name because the see-through cellophane wrapping was revolutionary and more civilised than the newspaper wrapping. At the time, it was nothing to do with the drying method. But as time went by it lost the original meaning and became the method of drying fish, i.e. drying without the sun light.
Incidentally, drying fish under the sun is called ‘tenpibosh’ (天日干し), which means sun-dried.
Dried fish is tastier than fresh fish
It is said that dried fish is tastier than fresh fish. There are few reasons for it:
- When the fish is dried, it increases the amino acid, which is the source of umami.
- By brining fish fillets in salt water, the surface of the fish muscle fibres swells and encloses moisture and umami within the flesh.
- The umami enzyme accumulates just below the dried surface.
- Because the fish is covered with a thin dried layer of flesh, it retains moisture better than fresh fish when grilled.
Interestingly, it doesn’t matter how the fish is dried, i.e. bunaboshi vs tenpiboshi.
If you cook these Semi Dried Whiting Fillets and compare them to a grilled fresh whiting, you will be able to tell the difference. In my view, whiting tastes better when it’s grilled after semi drying.
Filleting Whiting
Before explaining how to make dried fish, let me show you how I fillet whiting.
The photo below shows how I fillet whiting.
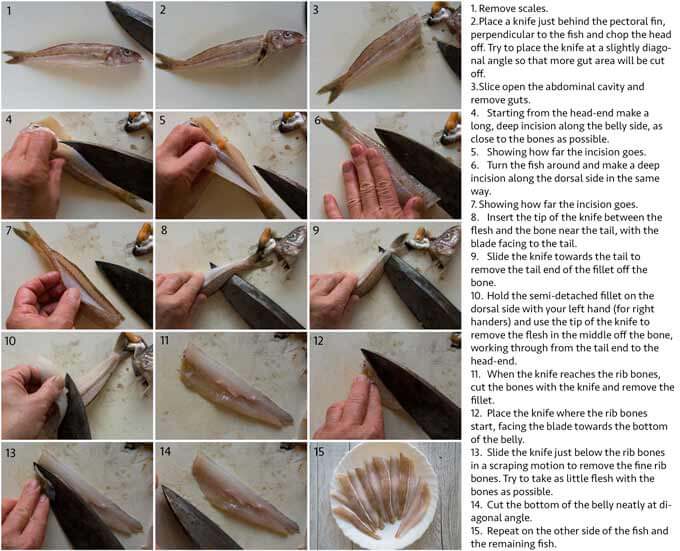
My method is probably not as common in Australia as the other method where you run the knife from behind the head to the tail horizontally and cut one side of flesh off the bone in one go.
But the method in the above photo is how I taught myself from a Japanese fishing book that included cleaning & filleting all sorts of fish.
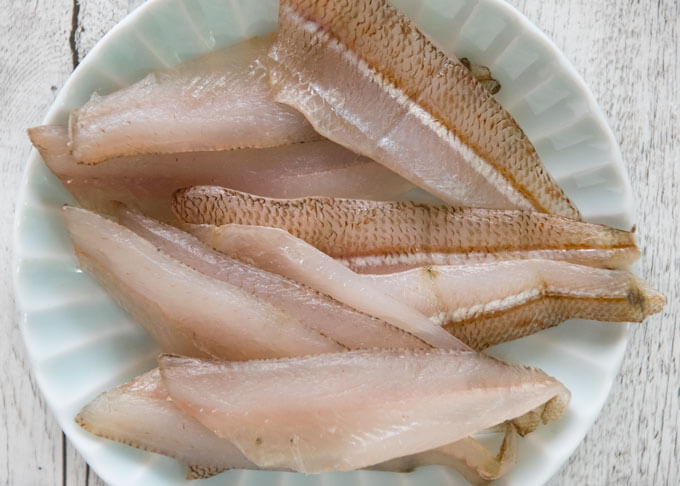
You can buy whiting that are already filleted but I usually buy whole whiting and make fillets myself. If your fishmonger is kind enough to make fillets out of the whole whiting, you are lucky.
I buy red spot whiting, not sand whiting or King George whiting. Red spot whiting is cheaper and smaller in size (my whiting was about 15-18cm/6-7” long from head to tail). You can make dried fish out of the large fillets, but I like the miniature ones as they can be served as nibbles as well as a main dish.

Brining Fillets
Before drying fish fillets you need to salt them, which acts as a preservative. Sprinkling salt over the fillets is the simplest and quickest method, but it is very difficult to evenly salt them.
I use the brining method so that the fillets are salted evenly. You only need to brine 30 minutes as a minimum. The longer you brine, the saltier the fish gets.
I made 5% salt water to brine the whiting fillets because it is a white meat fish and not oily. If you are brining oilier fish such as mackerel or yellow tail/horse mackerel you should increase the amount of salt to 10%.
Drying Fillets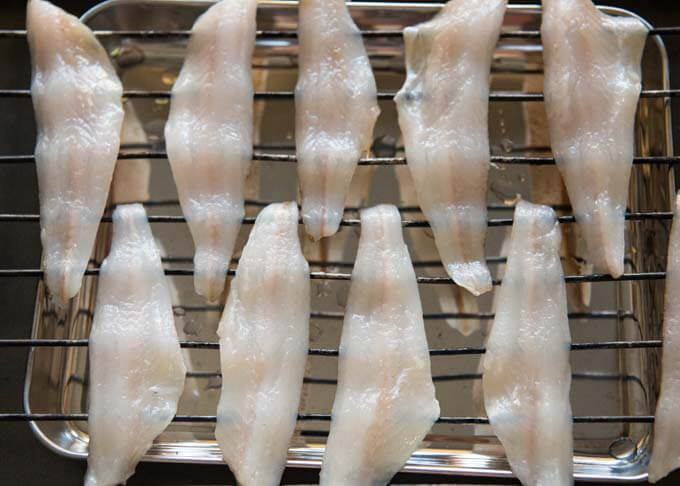
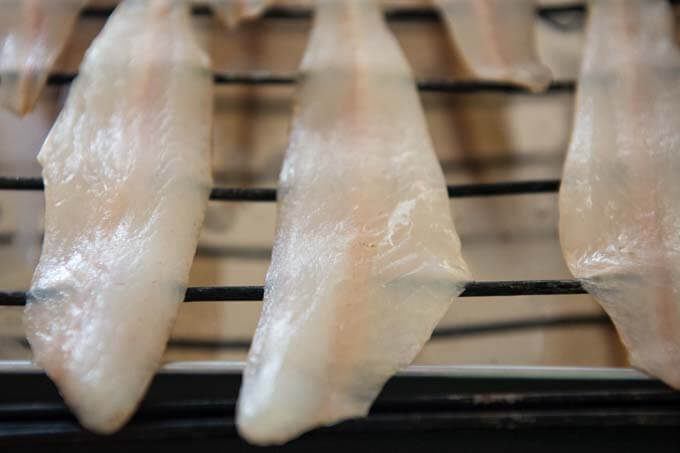
Pat dry the brined fillets with kitchen paper. Place them on a baking rack on top of a tray without overlapping (see the photo above).
Then leave it in the fridge without covering the fillets (the moisture has to evaporate in the fridge) for 24 hours to 48 hours. If your fridge has a fan inside, place it near the fan to make drying process more effective.
After 24 hours, you will see the surface of the fillets is just dried. After 48 hours, you will see the tails are pretty dry. Here are the fillets after drying for 48 hours. Can you see the difference between the above photo and the photo below?
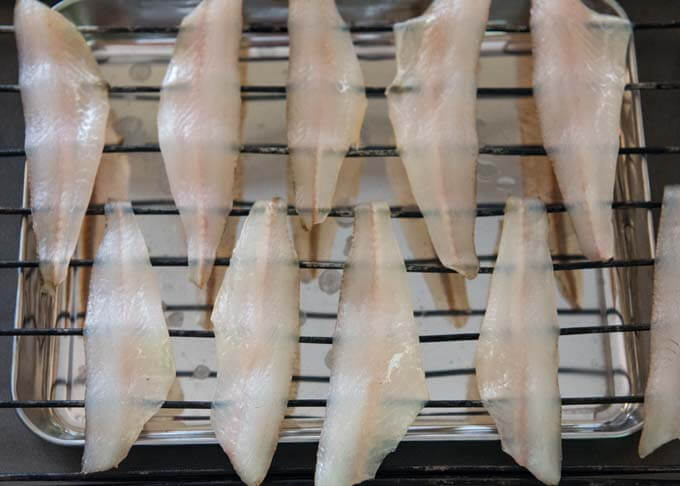
It is up to you how long you want to dry them in the fridge. The longer you dry the fillets, the less moist the grilled fillets will be and a tiny bit saltier as you’d expect.
And of course, you can dry them in the sun as long as they are covered with a net or something to avoid flies gathering on the fillets. If drying in the sun, you will only need few to several hours depending on the season and strength of the sun.
Presearving Semi Dried Whiting Fillets
Semi Dried Whiting Fillets keep about 4 days in the fridge. You can also freeze them for up to 1 month. Wrap the fillets individually with cling wrap and freeze them. Once frozen, they can be put in a zip lock bag together.
You can grill frozen fillets directly, but they taste better when you thaw them first then grill.
Dried whiting contains more umami than fresh whiting. When I see fresh red spot whiting at a reasonable price, I buy a couple of dozen whiting and make semi dried fillets. I love grilled fish, so it is comforting to know that they are always in the fridge.
The next week’s post will talk about how to grill whiting fillets.
Yumiko![]()
Semi Dried Whiting Fillets are packed with umami and the flesh is still soft and moist when grilled. All you need to do is to brine the fillets and leave them in the fridge uncovered.
Drying is a great way to keep the fish longer in the fridge and to preserve good flavour when frozen.
Prep Time includes filleting 5 whiting but does not include the time to dry, which can be 24-28 hours.
- 5 whole whiting about 400g/0.9lb in total (note 1)
- 150ml/5.1oz water
- 8g/0.3oz salt
-
Place a knife just behind the pectoral fin, perpendicular to the fish, and chop the head off. Try to place the knife at a slightly diagonal angle so that more gut area will be cut off.
-
Slice open the abdominal cavity and remove guts.
-
Starting from the head-end, make a long deep incision along the belly side, as close to the bones as possible.
-
Turn the fish around and make a deep incision along the dorsal side in the same way.
-
Insert the tip of the knife between the flesh and the bone near the tail, with the blade facing to the tail, and slide the knife to remove the tail end of the fillet off the bone.
-
Hold the semi-detached fillet on the dorsal side with your left hand (for right handers) and use the tip of the knife to remove the flesh in the middle off the bone, working through from the tail end to the head-end.
-
When the knife reaches the rib bones, cut the bones with the knife and remove the fillet.
-
Place the knife where the rib bones start, facing the blade towards the bottom of the belly. Slide the knife just below the rib bones in a scraping motion to remove the bones. Try to take as little flesh with the bones as possible.
-
Repeat on the other side of the fish to make the second fillet.
-
Rinse the fillets and pat dry them with kitchen paper.
-
Mix the Brine ingredients well until the salt is dissolved completely.
-
Put the brine in a shallow tray or a zip lock bag and add the fish filets to it, ensuring that all fillets are submerged in the brine. Leave for 30 minutes.
-
Drain and place each fillet on the rack without overlapping. Leave it in the fridge uncovered for 24-48 hours (note 4).
-
Wait for the next post, Grilled Whiting Fillets, to learn about cooking these fillets.
1. My whiting was red spot whiting, which is much smaller and cheaper than sand whiting. The whole whiting was about 15-18cm/6-7" long from head to tail, but when filleted the length of each fillet was 10-12cm/4-4¾" long. Alternatively, you can buy whiting fillets if they are very fresh.
2. The saltiness of the brine can be anywhere between 5-15%. For oily red meat fish, you will need saltier brine, but for white non-oily fish like whiting, 5% salt brine is adequate.
3. The tray should be large enough to place 10 fillets without overlapping.
4. It is up to you how long you want to dry the fillets for. After 24 hours of drying, the surface of the fillet should be dry but overall the meat should still be pretty soft when pressed. After 48 hours of drying, the edges of the fillet become dry and the tail-end hardens a bit.
5. Nutrition per fillet assuming that the amount of brined soaked up by the fillets is 10% of the weight of the fillets.
serving: 30g calories: 27kcal fat: 0.4g (1%) saturated fat: 0.1g (0%) trans fat: 0g polyunsaturated fat: 0.1g monounsaturated fat: 0.1g cholesterol: 20mg (7%) sodium: 80mg (3%) potassium: 75mg (2%) carbohydrates: 0g (0%) dietary fibre: 0g (0%) sugar: 0g protein: 5.5g vitamin a: 0.6% vitamin c: 0% calcium: 1.1% iron: 0.6%
すごい
Bought 1 kg whiting fillets from Costco yesterday, and was wondering if any Japanese recipe
This is exactly what I am looking for
由美子さん、ありがとうございます
Hi Bobby, perfect! If you have a food drying net like this, you can also dry many fillets at once under the sun.
Thank you for this recipe. They are so tasty I’m making a kilo load every week.
Wondering if you have any recommendations for other fish that are well suited to this semi-drying process?
Hi David, as long as the fish is fresh, you can dry any fish in theory. But given that it is not under the sun, I would choose the fish that are not to thick when filleted. Other popular fish to dry in the fridge include yellowtail/horse mackerel, small snapper, small pike or even mackerel. Instead of filleting them, you could just butterfly and dry if you want.