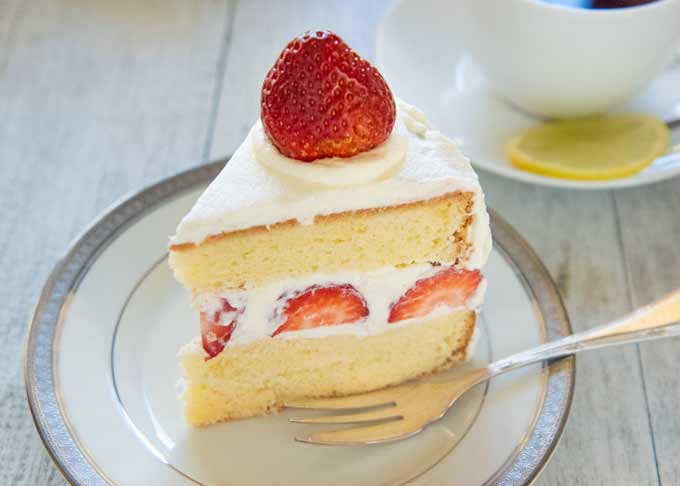
Japanese sponge cakes generally have a lighter and softer texture than those I get in Australia, and possibly other Western countries. The texture is almost like my Cotton Cheesecake. The most popular sponge cake by far in Japan is today’s recipe Strawberry Sponge Cake. Japanese people call this Strawberry Shortcake.
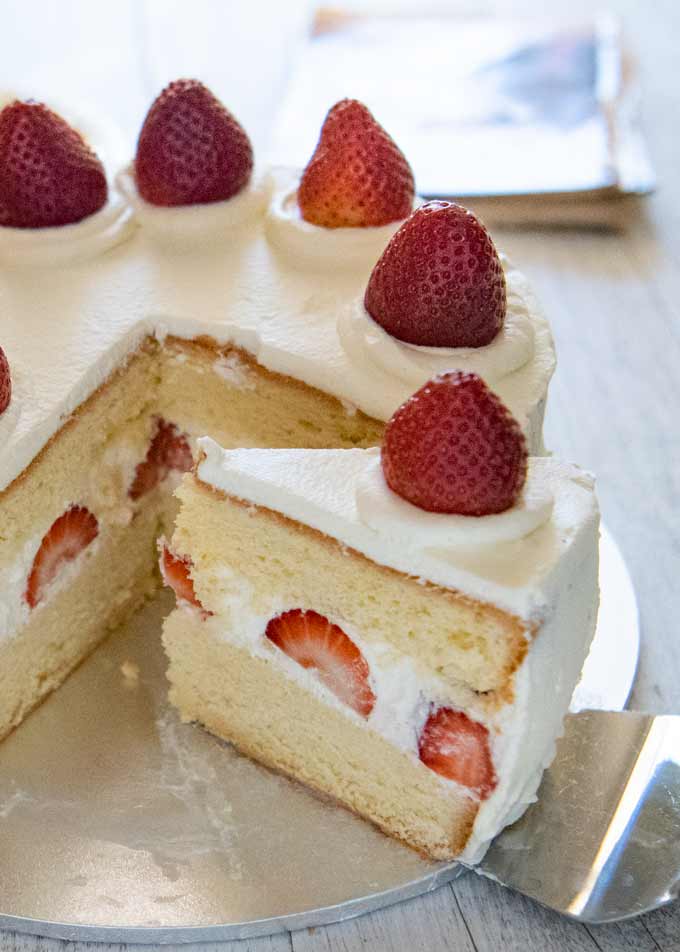
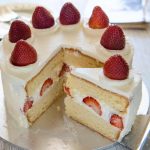
It is basically a sponge cake covered with cream, and strawberries on top. Sliced strawberries and cream are often sandwiched inside. It takes a bit of care while mixing the batter for the sponge cake so that the sponge rises to at least 5cm/2″ tall with a fluffy texture (as seen in the video). But it is totally worth it.
Strawberry Shortcake means different things in different countries. The American version of strawberry shortcake is a biscuit with whipped cream and fresh strawberries. In France, so called ‘shortcake’ does not exist but there is a strawberry cake that is a pink sponge cake with pink frosting, all made with strawberries as the primary ingredient.
The Japanese version of Strawberry Shortcake is a sponge cake decorated with whipped cream and fresh strawberries. Instead of strawberries, you can use other fruits to decorate the cake and it is still called a shortcake in Japan.
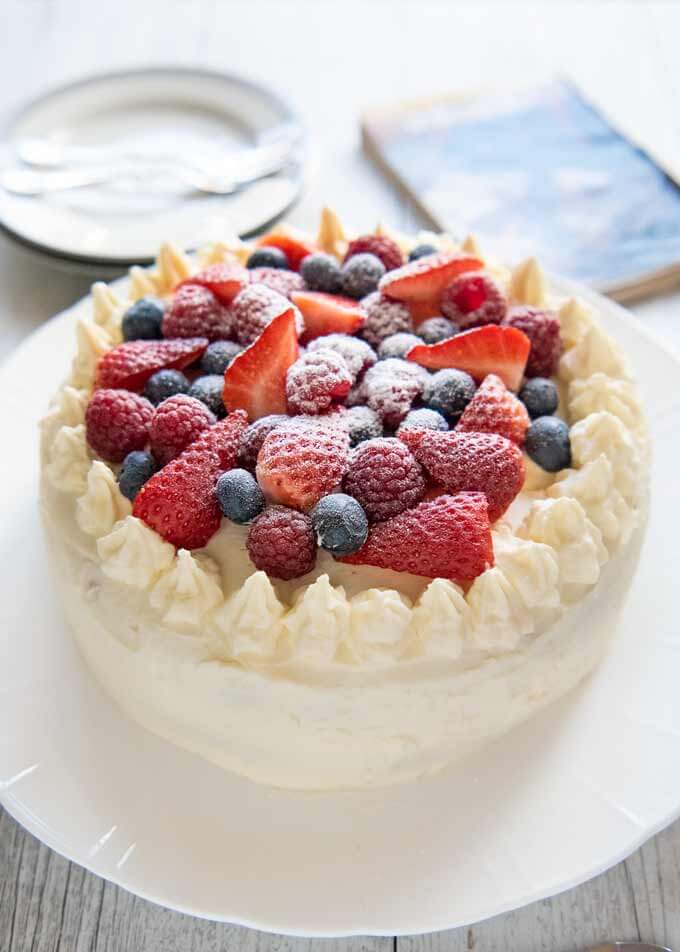
If you make it with slices of peach, you call it a peach shortcake. If mixed berries are used, like in the photo below, it becomes a mixed berry shortcake.
In the case of Strawberry Shortcake, it became so popular in Japan that the word ‘shortcake’ became synonymous with Japanese Strawberry Shortcake.
Japanese Strawberry Shortcake and Christmas
The Japanese version of Shortcake was developed by the confectionary and restaurant chain, Fujiya (不二家) in the early 20th century.
The entrepreneur of Fujiya travelled to the US and encountered the US version of strawberry shortcakes. When he returned from the US, he replaced the biscuit in the US version with sponge cake, as the softer texture of the cake was more suited to the Japanese palate.
To market the newly invented Strawberry Shortcake, Fujiya sold it as a Christmas cake and encouraged people to eat it on Christmas day.
If you visit a cake shop or the cake section of a department store in Japan, you will see all sorts of shortcakes. Many of them are already sliced into serving portions but some are round Japanese Strawberry Shortcakes like my cake today.
This round strawberry shortcake is the cake that many husbands and fathers buy and take home after work on Christmas Eve or Christmas Day (Christmas is not a public holiday in Japan!).
There are no religious customs or family celebrations and gatherings for Christmas in Japan. But many households still eat Strawberry Shortcakes, aka Christmas cakes as a custom.
What’s in my Strawberry Sponge Cake (Strawberry Shortcake)
My recipe is based on a very old cookbook I possess, which contains recipes for the sweets and dessert across the world. I referred to this book only for the sponge cake, with a slight adjustment. My decorations of whipped cream and strawberries are based on my memory of Fujiya’s Strawberry Shortcake.
Sponge Cake
Because the recipe is very old, the ingredients list for the sponge cake does not even include vanilla essence (you can add few drops if you want), or baking powder.
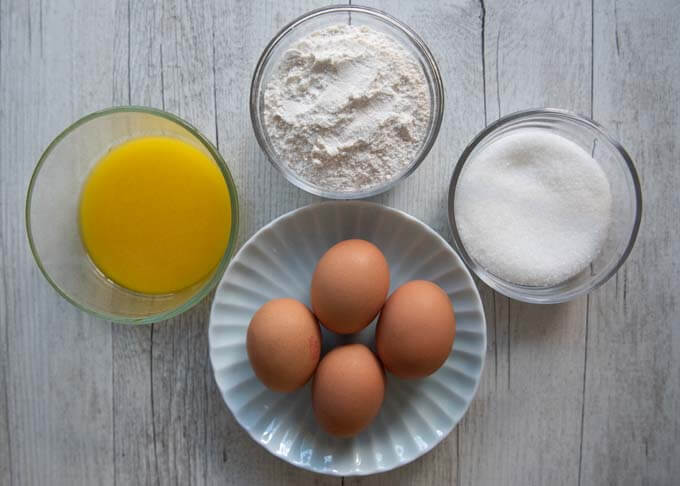
- 125g/4.4oz all-purpose flour
- 100g/3.5oz sugar
- 60g/2.1oz melted butter
- 4 eggs
The above ingredients are suited for baking in an 18-21cm/7-8″ round cake tin. The cookbook used 125g/4.4oz of sugar but I felt it was too sweet (probably because I don’t have a sweet tooth). If you wish, you can increase the sugar up to 125g/4.4oz.
Decoration
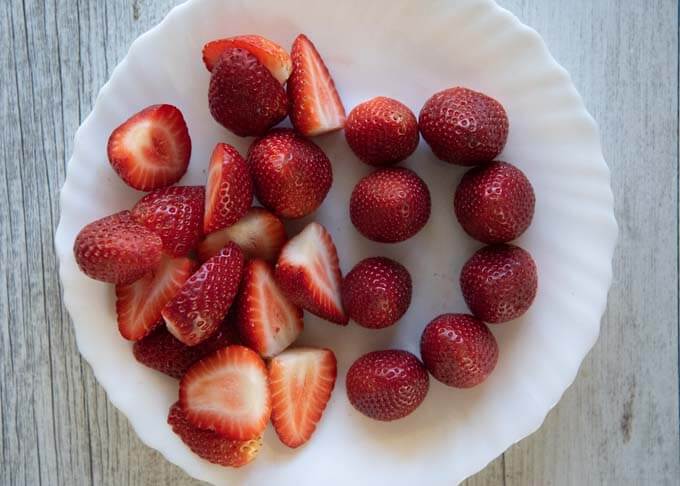
- About 450g/1lb of strawberries (I used 18 medium-sized strawberries). Halve 10 strawberries.
- About 400ml/0.8pt cream, whipped.
- Syrup (optional) made with 40ml/1.4fl oz water and 10g/0.4oz sugar
I am not definitive about the quantity of strawberries and cream. This is because the amount of these ingredients varies depending on the size of the cake tin, how tall your cake is and how much cream/fruit you put on the cake.
The syrup is brushed on the sliced surface of the cake pieces to keep the sponge soft and moist.
How to Make Japanese Sponge Cake
My old cookbook shows two different methods for making a sponge cake – (1) beating egg yolks and egg whites separately (recommended for beginners) and (2) beating eggs without separating the yolks and whites (makes the texture of the sponge more bouncy). I used the first method, but I added the second method in the recipe note.
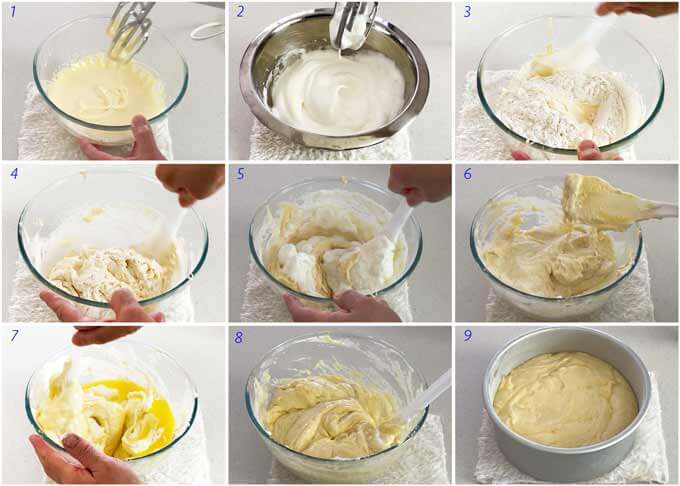
- Beat the egg yolk with ⅔ of the sugar in a bowl until it becomes whitish and thick (see the video for consistency).
- Beat the egg whites in a different bowl with the remaining sugar to make meringue (see the video for consistency).
- Add the flour to the beaten egg yolk.
- Mix and make smooth batter.
- Mix ⅓ of meringue into the batter.
- Fold the remaining meringue into the batter.
- Spread melted butter over the batter.
- Fold the butter into the batter.
- Pour the batter into a cake pan and cook in the oven.
The Key to a Fluffy Sponge Cake
I had a few comments from the readers who ended up with a flat and dense cake. This section gives you some tips for a successful fluffy sponge cake.
- Ensure the bowl and the beater are dry and grease-free because egg white does not like oil. Particularly if your bowl and utensils are plastic, make sure that they are completely oil-free as it is hard to remove grease from plastic bowls and tools.
- Use fresh eggs. Fresh eggs produce finer air bubbles when they are beaten, which results in a fluffier sponge cake.
- Bring the egg white at room temperature before beating. This let you beat up the whites easier. The air bubbles in the meringue are not as fine as those made from the chilled egg and results in a slightly coarse sponge. But if you are a beginner, you may want to try this.
- Ensure the egg white does not contain even a tiny piece of egg yolk. Egg white does not like yolk when it comes to making meringue because egg yolk contains fat.
- Do not add a lot of sugar at once to the meringue. As you add sugar, the foam diminishes a bit, so you want to add small amount at a time to minimise the impacts on the meringue.
- When mixing the batter with flour or merengue, or butter, do not overmix. You need to gently fold the batter. By over mixing, you are getting rid of tiny foam.
- Gently but quickly fold the batter after you have added butter as the butter causes the foam to disappear fast.
Of these tips, I think the most common trap is over mixing the batter. There are so many cakes that can be mixed vigorously before transferring to the cake pan. Not for Japanese Sponge Cake, I am afraid.
Decorating the Sponge Cake to make Strawberry Shortcake
Decorating the cake is not particularly difficult. Perfectly covering the cake with whipped cream like the cakes sold at the shops is an art in my view, and it is quite hard. As you can see in the video, my decoration is not perfect but it’s still pretty, I think.
The right thickness of the whipped cream is the key to the evenly coated cream around the sponge cake. You should not whip the cream too much, but the cream should not be too soft either. When you lift the whisk, the cream should form a soft peak.
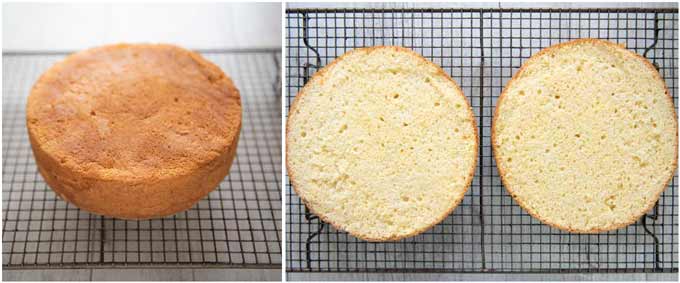
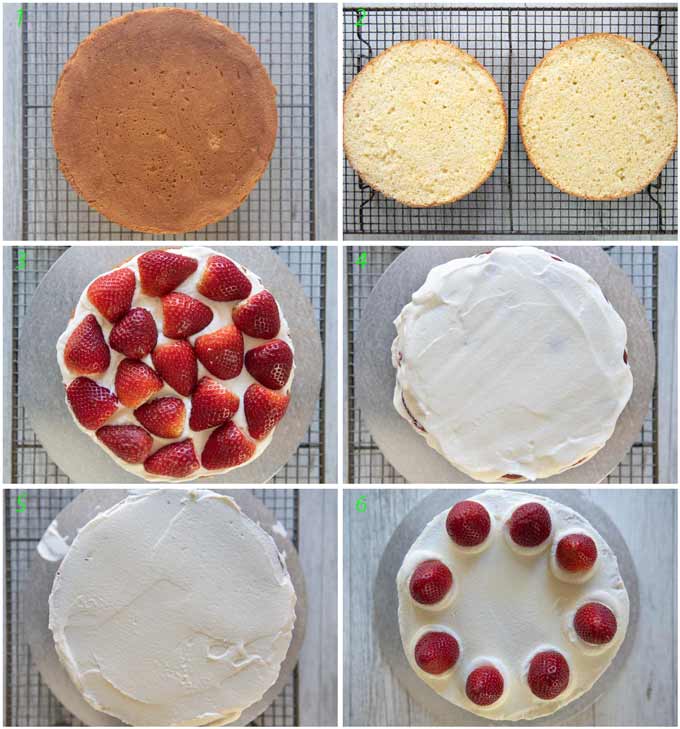
- Cool the sponge cake upside down so that the top of the cake is perfectly flat and easy to decorate.
- Slice the cake horizontally in the middle to make two round cake pieces. Coat the cut sides of the cake with syrup.
- Spread the bottom part of the cake with the whipped cream, then place halved strawberries on top, covering the entire surface.
- Cover the strawberries with more cream, then put the top part of the sponge cake on it.
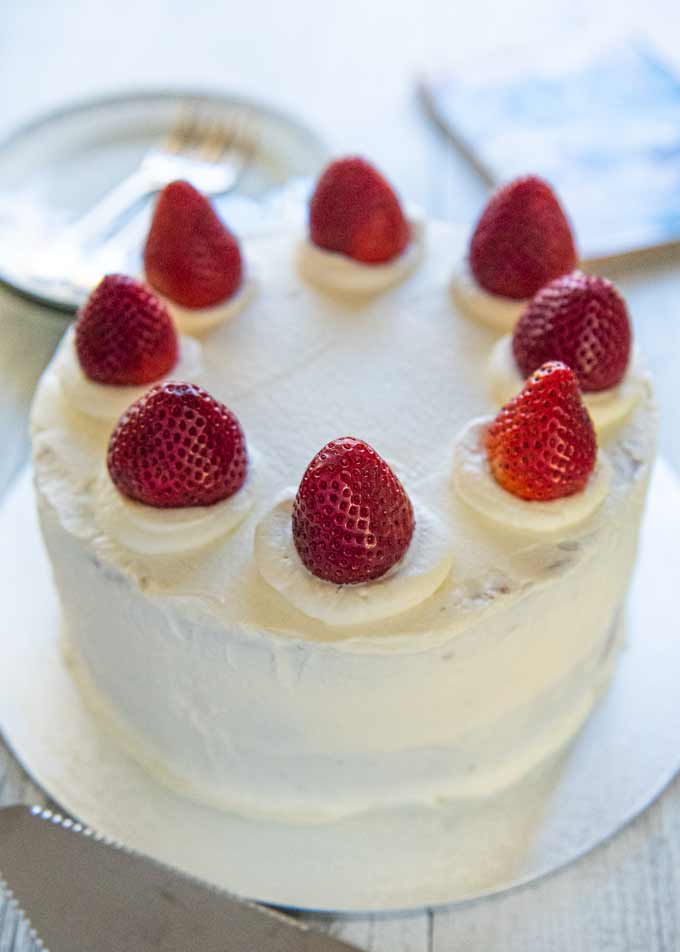
- Coat the side and the top of the cake with cream, then decorate the outer edge of the round surface using a piping tip.
- Place the strawberries on top of the cake.
There are no rules for decorating the sponge cake. If your cake is not very tall, you may not want to halve the cake horizontally to make two layers of the cake with strawberries and cream in the middle. Some recipes do not cover the side with the whipped cream either.
You can decorate the cake anyway you like. But no matter how it looks, I can guarantee you the cake is super delicious. It is not too sweet, unlike most of Aussie cakes, and that’s what I like about this cake.
Yumiko![]()
Watch How To Make It
Japanese sponge cakes in general have a lighter and softer texture than those I find in Australia, and possibly other Western countries. The texture is almost like my Cotton Cheesecake. The most popular sponge cake in Japan is by far the Strawberry Sponge Cake, aka Strawberry Shortcake. (Watch the Video)
- 125g (⅔cup+1½tbsp) all-purpose flour sifted 3 times
- 100g (⅓+1⅓tbsp) sugar (note 1)
- 4 large eggs , yolks and whites separated (note 2)
- 60g (¼ cup) butter , melted
- Butter and flour to coat inside the cake pan
- 18 strawberries (mid-size, note 3)
- 400ml/0.8pt cream for whipping (note 4)
- 10g (2½ tsp) sugar
- 40ml/1.4oz water
- 10g/0.4oz (2½ tsp) sugar
-
Pre-heat oven to 180°C/356°F, fan forced.
-
Coat the inside of an 18cm/7" cake tin (note 6) with butter (not in the Ingredients list), dust with flour (not in the Ingredients list), then shake off the excess flour.
-
Put the egg yolks in a bowl, add ⅔ of the sugar and beat the egg yolks until they become whitish and thick. Draw a ribbon with the whisk and if the ribbon disappears slowly (see the Video), it is ready.
-
In a separate bowl, beat the egg whites. When the small bubbles form and the volume of the egg white doubles, add the remaining sugar in 2-3 batches and beat further to make meringue.
-
When the meringue becomes firm and it can form a peak when you lift the whisk (see the step-by-step photo and video in the post), it is ready.
-
Put the flour through the sifter and add to the beaten egg yolk. Fold the batter with a spatula.
-
Transfer ⅓ of the meringue to the batter and mix with a whisk until the batter becomes smooth.
-
Add the remaining meringue to the batter in 2-3 batches and fold.
-
Pour the melted butter into the batter and fold several times. It's OK even if the butter is not completely mixed.
-
Pour the batter into the cake tin. Drop the tin onto the work bench to settle the batter in the tin.
-
Cook in the oven at 180°C/356°F for 25 minutes. Insert a thin bamboo skewer in the centre of the cake to see if the skewer comes out dry. If the skewer is a bit wet, cook further 5 minutes.
-
Take the tin out of the oven and drop the tin onto the workbench a couple of times to detach the cake from the tin. Remove the cake from the tin and place it on a rack, upside down (bottom side up). Let it cool completely.
-
If making syrup, put the Syrup ingredients in a small saucepan and bring it to a boil. When the sugar is dissolved, turn the heat off. Let it cool.
-
Add sugar to the cream in a bowl. Whip the cream until soft peaks form. Wipe the strawberries with a wet kitchen paper, remove the stems and halve 10 strawberries.
-
Leave the sponge cake upside down as is and slice it horizontally in half (note 7), remove the top half and place it next to the bottom half of the cake, cut side up.
-
Using a brush, coat the cut surface of the two sponge cakes with the syrup gently.
-
Drop about 3 heaped tablespoons of the whipped cream on the bottom half of the sliced cake and spread it to cover the entire surface. Fill the surface with the halved strawberries, without a gap as much as possible.
-
Drop about 4 heaped tablespoons of the whipped cream on and spread it to cover the strawberries and the round edge.
-
Place the top half of the cake on it, syrup side down. Gently press down, making sure the top and bottom cakes are aligned. Fill the gap around the strawberry filling on the side with whipped cream.
-
(Optional) thinly coat the top and the side of the cake with whipped cream. It is OK not to completely cover the sponge. Leave the cake in the fridge for 10 minutes (note 8).
-
Using a cake spatula or a long flat spatula, fully cover the top and the side of the cake with the remaining whipped cream, leaving some (about minimum of 4-5 tablespoons) for piping.
-
Put the remaining cream in a piping bag with a round nozzle. Squeeze out the cream to make a mound of cream in 8 positions around the edge of the surface. Place a strawberry on each mound.
1. My cake is not too sweet. If you prefer it sweeter, increase the quantity of sugar up to 125g / 4.4oz.
2. It is important to use very fresh eggs. Using old eggs is likely to result in a flat sponge cake.
My eggs were from a 660g/23.3oz carton of a dozen eggs. The average weight of my eggs were 55g/1.9oz.
3. My 18 strawberries weighed about 450g/1lb. I used halved strawberries as fillings but if you slice them, you can reduce the number of strawberries.
Instead of strawberries, you can use other berries to make it a mixed berry shortcake (see the photo in the post), or different fruits such as sliced peach, kiwifruits, pineapples, orange, grapes, or all of these mixed together!
4. The amount of whipped cream varies depending on the size of the cake tin, how tall your cake is and how much cream you put on the cake.
5. I did not use it, but you can add a small amount (½ teaspoon) of liquor of your choice if you want.
6. I tried with a springform cake tin as well as a non-springform tin. The springform tin leaves a dent at the bottom of the cake when cooked. For this reason, I prefer a non-springform tin. I had no problem removing the baked cake out of the non-springform tin.
The size of the tin can be up to 21cm/8" with the ingredients listed here. Any larger than that will make the cake thin, and it will not be easy to slice into two layers.
7. The easiest way to slice the round cake horizontally is to make a shallow cut around the side of the cake first, then slide the knife deeper into the centre ensuring that the blade traces the initial cut.
8. This will make the remaining whipped cream stick easier, particularly on the side.
9. My method of making a sponge cake is to beat the egg yolks and whites separately. There is another method of making the batter by beating whole eggs. If you want to use this method, here are the steps to replace steps 3-9 in my recipe:
1) Put the eggs in a bowl, mix, then add sugar. Beat the eggs over a 60°C/140°F water bath.
2) When the egg mixture is warmed up to around body temperature, remove the bowl from the water bath.
3) Continue to beat until the egg mixture cools down and becomes thick whitish batter. When you draw a ribbon with the whisk, the trace of the ribbon should slowly disappear.
4) Add the flour through a sifter to the batter and fold it in with a spatula. Add butter and fold several times.
10. You should consume the cake within 2 days. Although the sponge cake will keep longer, the flavour of the strawberries and cream start degrading by the 3rd day.
11. Nutrition per serving.
serving: 146g calories: 346kcal fat: 22g (34%) saturated fat: 13g (65%) trans fat: 0.7g polyunsaturated fat: 1.4g monounsaturated fat: 6g cholesterol: 152mg (51%) sodium: 95mg (4%) potassium: 151mg (4%) carbohydrates: 31g (10%) dietary fibre: 1.2g (5%) sugar: 18g protein: 6.2g vitamin a: 18% vitamin c: 40% calcium: 3.8% iron: 7.6%
Originally published in August 2020, improved contents including the recipe and added video in January 2022.
I love this recipe! Luckily the only cake tin I had was a 7 inch. It tasted great and I got tons of compliments. Extremely simple and easy for something that seems complicated. I decided to use 125g of sugar instead because I have a sweet tooth. One thing I will say, is that the baking times seem to be off. I baked it for 25 minutes but it was still underbaked by the time I took it out. I baked it for about 10 more minutes and it came out perfectly done. My oven was the right temperature and I checked using an oven thermometer, which has proven to be very accurate for me.I also used a springform pan to bake this and did not notice and defects so if you use one I think it’s ok. The video was very helpful also 🙂 thank you for this great recipe.
Hi Tuna, thanks for your feedback. It took me 25 minutes to bake. My oven was fan forced, which might be the difference. Or you might have whipped the batter well and you had a taller cake than mine, which certainly changes the baking time. There are many variables when it comes to cooking with heat. but I am glad that you like this recipe!🙂
This looks delicious! Can I make the entire cake 1 day before eating? I’m worried about how the whipped cream will hold up. Thanks!
Hi Olivia, you can keep the whole cake in the fridge for a day. Because of the cream, it has to be stored in the fridge and whipped cream should hold up.
Make sure that the cake is stored in an airtight container – place a large and deep container upside-down and put the cake on the lid. If you are placing the cake in a cardboard cake box, wrap the box with cling wrap so that the cake does not dry.
Thank you so very much. Looking forward to making this!
Can you prepare the sponge a day ahead? (Is it okay to bake and put in fridge?) thank you!
Hi Joanna, yes, you can keep the sponge for a day. If the room is cold, you can leave it in the room, otherwise put it in the fridge. To prevent the sponge from getting dried, you need to put it in a airtight container (recommended), put it in a large ziplock bag, or wrap it with cling wrap (least recommended). If using a ziplock bag, make sure that the bag is inflated inside so that you can prevent the bag from touching the surface of the cake. If the bag touches, the surface of the cake might peel of (although you can cover it with cream).
Hello! Could I turn this into a single layer sheet cake? What would that entail? Your vanilla sheet cake recipe was to die for!
Hi Kamiya, yes you can.
You would want to reduce the thickness of the cake, perhaps by 1/3 (or bit more) to make a single layer. If you will be using a cake pan as per the recipe, you’ll need to reduce all the ingredients by the same ratio. Baking time will need to be reduced by 5-10 minutes.
Alternatively, you can use a larger cake pan with the ingredients per the recipe. Baking time is probably similar to the recipe.
In either option, I’d suggest that you check the doneness by putting a bamboo skewer through in the centre of the cake. If the surface of the cake start browning before the centre of the cake is cooked, over the surface with a sheet of aluminium foil.
Thank you!
Could you put a heavier frosting on this, like a stiff buttercream? Or would it affect the sponginess of the cake? I’m working within bride-specified parameters and I’m trying to figure out if it would work 🤔
Hi Saliene, the sponge cake can have buttercream on it. But fresh fruits are not suited for buttercream.
Is the butter salted or unsalted?
Hi Tarrin, normal butter, i.e., salted.
hi!, could you make the sponge cake the night before and decorate the next day? will that be a problem?
Hi, Ally. Yes, you can. If possible, leave it at room temperature. But if the room is very hot, you can place it in the fridge. Remove the cake from the cake pan, wrap it in cling wrap after cooling it down.
Can you make cupcakes with this recipe?
Hi Georgia, you should be able to make sponge cake in cupcake liners. I haven’t made them yet but looking at some recipes, baking time is about 20 minutes at 170°C/338°F. I would decorate only the top of the cup cake with whipped cream and a strawberry on top.
this recipe makes me cry sometimes but it always produces an incredible result!! the extra notes are extremely helpful, thank you so much ^o^!!
Hi Meecaw, it’s good to hear that the outcome has been consistently great.
Worked perfectly, so good to find a traditional Japanese recipe 💕
Hi Maya, that’s great!
You know, I made a mistake, but it still came out beautifully and was very delicious. I will most definitely make this again. I always love when a recipe has a history so I think I’m going to start making more recipes from this website and hope they turn out as delicious as this.
Hi Nataniel, it’s good to hear that your cake came out nicely. I would like to hear what you think of other dishes.