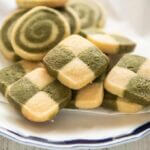
My buttery and slightly crumbly Matcha Cookies come in a checkerboard pattern and a swirl pattern. They are made with a butter cookie dough that is split in half to make Matcha flavoured dough and plain dough. The slight bitterness from the matcha powder is surprisingly pleasant with the sweetness of the cookies. (Watch the Video)
- 120g/4.2oz unsalted butter softened
- A pinch of salt
- 70g/2.5oz caster sugar/super-fine sugar
- 1 egg yolk
- 1/8 tsp vanilla extract (or vanilla essence)
- 170g/6oz flour split into 90g/3.2oz and 80g/2.8oz
- 10g/0.4oz matcha powder (see the sample photo in the post)
- 1 tbsp egg white
-
Sift 90g/3.2oz flour onto a sheet of baking paper. Sift 80g/2.8oz flour and matcha powder together onto a separate sheet of baking paper (matcha flour).
-
Beat the butter in a bowl until it becomes creamy.
-
Add the sugar in 3-4 batches to the butter and mix well each time after sugar is added.
-
Add the egg yolk, then salt and vanilla extract to the butter and mix well.
-
Transfer half of the butter mixture to a new bowl (note 1).
-
Add the 90g/3.2oz flour to one of the bowls with butter to make vanilla-flavoured dough. Mix the dough well in a cutting motion using a spatula (note 2) until there is no powdery flour left and the texture of the dough is consistent.
-
Place the dough on a piece of cling wrap and wrap the dough, shaping a rectangle into about the size of your palm.
-
Turn the smooth side of the wrapping up. Press down the dough and massage the surface to push the dough to fill the corners of the rectangle. Chill it in the fridge for 2 hours or longer, even 1 day (note 3).
-
Repeat steps 6, 7, and 8 with the matcha flour and the other butter in the bowl to make matcha-flavoured dough.
-
Take the dough out of the fridge and divide the vanilla-flavoured dough into two equally weighted chunks (a half to make checkerboard cookies, the other half to make swirl cookies). Do the same for the matcha-flavoured dough.
-
Massage a half of the vanilla-flavoured dough in both hands to soften the dough a bit.
-
Make a 3cm x 3cm/1⅛" x 1⅛" square log with a half of the vanilla dough (note 4) and wrap it in cling wrap. Chill in the fridge for 1 hour or until the dough becomes hard. Do the same with a half of the matcha dough.
-
Cut the square logs into half lengthwise, then halve each half again, lengthwise.
-
Brush a cut side of a vanilla strip with the egg white, then stick a matcha strip to it. Make sure that the cut side of the matcha strip is connected to the vanilla strip and both strips are also showing the other cut side together (note 5).
-
Brush the cut side of vanilla and matcha strips that were just connected, and place a vanilla strip on the matcha side ensuring that the two cut sides are not facing outside (note 5).
-
Brush the side of the 2nd vanilla strip and stick the 2nd matcha strip next to it, facing the cut side inwards (note 5). You should see alternate vanilla and matcha dough strips, joining 4 strips together (checkerboard pattern).
-
Repeat steps 4-6 and make another checkerboard square log. Wrap them with cling wrap and chill for 1 hour or until the dough becomes hard.
-
If the edge of the square log is not tidy, trim the edge (you will use it later), then cut the log into square pieces 6-7mm/¼" thick.
-
Massage a half of the vanilla-flavoured dough in both hands to soften the dough a bit.
-
Place the dough in a zip lock bag of about 15cm x 18cm/6" x 7" (note 6). Seal the bag with a small opening to allow the air to escape.
-
Using a rolling pin, stretch the dough thinly to fill the plastic up to 2-3cm/¾-1⅛" below the zip line (note 7).
-
Fold the bag along the zip lock so that the depth of the bag becomes 15cm/6" (note 7) and place the bag facing zip side down.
-
Keep rolling the pin to fill the top part of the bag to the folded edge. Ensure that the thickness of the dough is consistent.
-
Turn the bag over. Using fingers, shift the dough to fill the shallow dent created by the zip line.
-
Chill for 1 hour or until the dough becomes hard.
-
Repeat above steps with the other half of the matcha dough.
-
Cut along the zip line to remove the zip of the vanilla dough bag. Starting from the opening, cut one side of the bag with a knife, then rotate the knife 90 degrees and continue to cut the bottom edge of the bag (note 8). Gently peel the upper plastic off the dough. Do the same for the matcha dough.
-
Brush the entire surface of the vanilla dough with egg white.
-
Place the matcha dough on top of the vanilla dough by turning the plastic sheet of the matcha dough over and gently peel off the plastic on the matcha dough. Make sure that there are no air pockets between the vanilla dough and the matcha dough.
-
Brush the surface of the matcha dough. Starting from the shorter edge of the dough with no excess plastic sheet, roll the sheet of dough tightly to make a log (note 9). Use the plastic sheet to control the rolling.
-
Wrap the log in cling wrap and chill it for 1 hour or until the dough becomes hard.
-
If the edge of the log is not tidy or too thin, trim the edge (you will use it later), then cut the log into 6-7mm/¼" thick discs.
-
Collect the edge bits trimmed from the logs and make a thick disc of about the same diameter as the swirl cookies.
-
Cut it into similar thickness to the other cookies.
-
Preheat oven to 180°C/356°F.
-
Place the cookie pieces on a baking tray lined with baking paper. All the cookies should fit in if you use a large baking tray.
-
Bake for 12-13 minutes, then turn the oven off and open the oven door to let the moisture evaporate for 1-2 minutes.
-
Using a spatula, gently transfer the cookies to a rack to cool down for about 30 minutes to 1 hour.
1. I place a new bowl on a scale and reset the weight to zero, then transfer the entire butter mixture to the bowl to check the weight of the mixture. Then take half of it and return it to the original bowl. Now you have two bowls of half the butter mixture each.
2. Try not to press down the dough as if you are kneading. This will develop the gluten, which makes the cookies less crispy.
3. By chilling the dough for 2 hours+, it makes the gluten within the dough harder to develop, resulting in light and crispy cookies.
4. I drew a 3cm/1⅛" wide rectangle on a piece of baking paper and used it as a guide to measure the width of the cuboid.
If you have 3cm/1⅛" thick levellers, you can make a straight and accurate square log. I don’t have levellers, but I had a 3cm/1⅛" square timber, so I used two of them to make the side of the square log straight (see the video).
If you have 1.5cm/⅝" levellers, you can make a flat rectangle of 1.5cm/⅝" high and 6cm/2⅜" wide instead of 3cm/1⅛" square log. When cutting it, you can quarter the dough into 1.5cm square strips.
It’s OK even if it’s not a perfectly straight log, but make sure that the 3cm/1⅛" square is accurate.
5. The idea is to glue the cut sides of the strips that are straight and stick perfectly with no gaps. If you think you might get confused, place 2 each of vanilla and matcha strips alternatively with the cut sides attaching to each other without using egg white. Then glue the connecting sides with the egg white.
6. I used a Hercules brand zip lock sandwich bag (18cm x 16.5cm/7" x 6½"). In the US, a Ziploc freezer quart bag (7" x 7 7⁄16") might be the closest.
Alternatively, you can make an envelope using baking paper. Fold a long piece of baking paper twice into a 15cm/6" wide piece, making an open-end envelope. Then, fold both open ends to make a 18cm/7” long closed envelope (it will make your life easier if you draw a 15cm x 18cm rectangle on the paper before folding). Open the paper and place the dough in the centre of the rectangle on the paper. Fold the paper along the line to wrap the dough.
If using baking paper instead of a zip lock bag, wrap the dough in the baking paper with cling wrap before chilling.
7. I needed to make an 18cm x 15cm rectangle dough to roll the dough to about 2.5mm/⅛" thick, but my plastic bag was 18cm/7" wide and 16.5cm/6½" deep. So, I had to fill the dough 1.5cm/⅝" below the zip line.
If you bag is larger, you need to make a larger gap between the end of the dough and the zip line. E.g., if you are using a Ziploc freezer quart bag (7" x 7 7⁄16"), fold the bag below the zip line to make the bag 6" deep.
8. If you are using a Ziploc freezer quart bag (7" x 7 7⁄16"), you should cut both sides of the plastic bag from the opening so that you will have excess plastic at the end when rolling the dough.
9. If you fold the dough narrowly along the edge, you can easily start rolling. Make sure that you roll tightly. Loosely rolled dough will result in gaps in the swirls when baked.
10. If you want to make cocoa checkerboard cookies, you can reduce the flour to 165g/5.8oz and replace the matcha powder with 15g/0.5oz of cocoa powder.
11. Nutrition per cookie, assuming 40 cookies are made.
serving: 10g calories: 45kcal fat: 2.6g (4%) saturated fat: 1.6g (8%) trans fat: 0g polyunsaturated fat: 0.1g monounsaturated fat: 0.8g cholesterol: 11mg (4%) sodium: 4.6mg (0%) potassium: 6mg (0%) carbohydrates: 5g (2%) dietary fibre: 0.1g (0%) sugar: 1.8g protein: 0.6g vitamin a: 0% vitamin c: 0% calcium: 0% iron: 1%