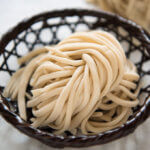
The texture of Home-made Udon Noodles is no comparison to those fresh noodles you buy from the shop. The noodles are chewy and springy, and they taste great! You need to use a bit of arm muscle to knead the dough but making Udon Noodles requires no special skills and it is so worth it.
- 100g/3.5oz plain flour (note 1)
- 100g/3.5oz strong flour/bread flour (note 1)
- 8g/0.3oz salt (note 2)
- 100ml/3.4oz water
- Flour or cornflour to dust the work bench and noodles
-
Dissolve salt in the water.
-
Add flour to a bowl, then add ½ of the salt water. Using your hand mix vigorously, ensuring that there are only small lumps of flour.
-
Add the remaining salt water to the flour and mix well. There should be no large lumps in the flour (see the photo in post).
-
Collect the flour bits together and make a ball in the bowl while pressing the dough, by rolling the flour from outside to inside.
-
When you can form a ball of dough, transfer it to a flat cooking bench sprinkled with a small amount of flour.
-
Knead the dough using the base of your palm. Stretch the dough, fold it, then knead to stretch. Repeat for 5 minutes until the surface of the dough becomes smooth (note 3).
-
Make a ball with the dough and wrap it with cling wrap. Leave it at room temperature for 30-60minutes (note 4) until the dough bounces back ⅓ of the way when poked with a finger.
-
Dust the work bench with flour. Take out the dough and place it on the work bench.
-
Starting from the edge of the dough, drop a rolling pin onto the dough to flatten it by gradually shifting the position of the pin on the dough.
-
Shape the dough into a square shape with round corners. Stretch the dough with the rolling pin into a large square shape by rotating the dough 90 degrees. Dust the surface of the dough from time to time.
-
Stretch the dough with the rolling pin into squarish shape until it becomes 3mm thick (about 25-30cm square).
-
Sprinkle flour over the dough (note 5) and fold it a couple of times in the same direction so that the width of the dough becomes narrow in one direction.
-
Place the folded dough lengthwise on a cuting board. Starting from the right edge (for the right hander), cut it to a thickness of 3mm/⅛".
-
After several cuts pick up noodles and toss with some more flour to prevent noodles from sticking each other.
-
Boil sufficient amount of water in a large pot.
-
Drop the noodles into the boiling water and cook for 10-12 minutes. Do not mix immediately after the noodles are put into the boiling water as the noodles tend to break.
-
When the bubbles start rising and get close to overflowing, add a small amount of cold water to lower the bubbles, then reduce the heat slightly so that the water is boiling vigorously.
-
Drain and rinse in cold water until the noodles cool down completely and the stickiness of the noodles is removed. Put the noodles in a sieve and drain well. They are ready to use (note 6).
-
Home-made Udon Noodles can be refrigerated up to 1 week. Boiling time of the refrigerated noodles is only slightly longer than cooking them immediately.
-
You can freeze Home-made Udon Noodles as well. Divide the noodles into serving portions (100g/3.5oz each for standard serving) and store each portion individually in a zip lock bag (note 7). You can freeze them for about 1 month.
-
Frozen noodles can be cooked without thawoing. Boiling duration will be a few minutes longer than cooking the fresh udon noodles.
1. Alternatively 200g/7oz medium strength flour to replace the mixture of plain and strong flour.
2. The amount of salt is 4-6% of the amount of flour. My salt was 4%, and when boiled, the saltiness of the noodles was noticeable.
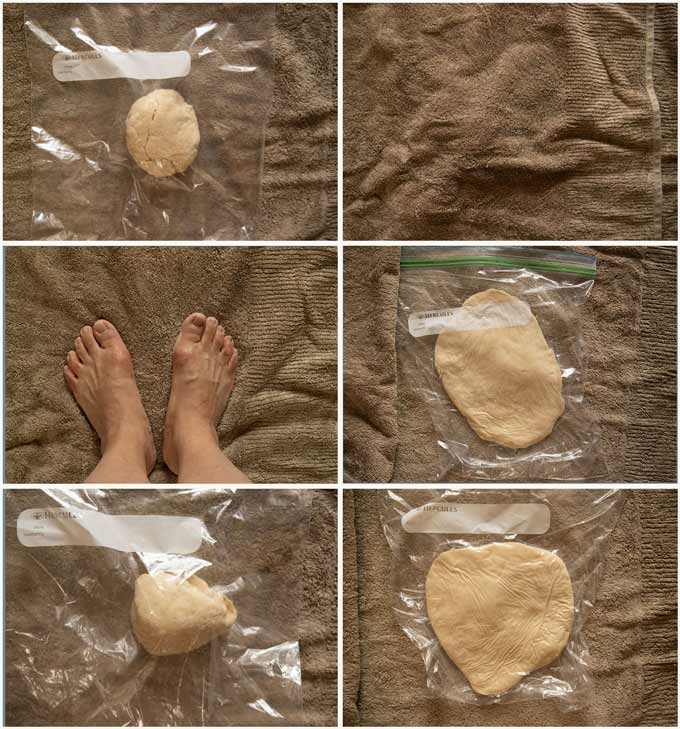
3. The duration of kneading depends on how strong your arm muscles are and how much weight you can put on the dough. After 5 minutes of serious kneading, the dough should become reasonably smooth when formed into a ball.
Instead of using your hands, you could knead with your feet. Place the dough in a large zip lock bag, remove as much air as possible and seal. Fold a towel in half and put it on the floor. Place the zip lock bag between the towel (for hygiene reasons), then step on it with your feet. After stepping several times on the dough, roll the flattened dough into a ball and then step again.
4. The resting time depends on the temperature of the room. The warmer the room is, the faster the dough takes to reach to the right texture of the dough. I needed to rest mine for 1 hour because my room was air conditioned and cool.
5. You need to flour sufficiently so that layers of dough do not stick to each other.
6. 100g/3.5oz of freshly made Udon Noodles becomes about 170g/6oz after boiling which is perfect for 1 standard serving.
7. Alternatively, make each serving portion a flat mound and place them in an air-tight container without touching each other. Place the lid on and freeze. When they are completely frozen, you can take them out of the container and put them in a zip lock bag and store.