It is easiest if you can get a packet of Kiriboshi Daikon from stores, but you can make Kiriboshi Daikon at home quite easily too. All you need to make Home-made Kiriboshi Daikon (Dried Shredded Daikon) is a fresh daikon and several days of sunny weather!
Why don't you make Simmered Kiriboshi Daikon (Dried Shredded Daikon) from scratch?
- 300g/0.7lb daikon , peeled (note 1)
- A drying net, a flat bamboo basket, or a cane tray (note 2)
-
Cut daikon into about 5cm long discs (note 3). Place the daikon disc with the round surface on the cutting board and cut it into 5mm/3/16" thick rectangular slices.
-
Pile the rectangle slices on top of each other a few slices at a time, and cut them into 5mm/3/16" matchsticks in the same directions as the slices are cut.
-
Spread the daikon matchsticks over the drying surface of the net/basket, separating each piece as much as possible (note 4). A couple of daikon pieces can be stuck but there should not be many sticks piled up.
-
Place the daikon in the sun until sunset (note 5). You will notice that some daikon pieces are already semi-dried and shrunk. If they are not semi-dried, it is likely that two or more daikon pieces are stuck together. Separate them into individual pieces.
-
Bring the daikon net/basket inside the house, then take it out into the sun the next morning.
-
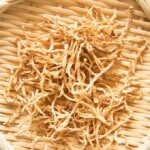
Repeat steps 4 and 5 for 5-7 days until the daikon pieces become yellowish (see the photo in post) and crispy (note 6). The Kiriboshi Daikon is now ready.
-
Place the dried daikon pieces in a zip lock bag and store in a dry place or fridge until required. It keeps 6-12 months.
1. It doesn’t have to be 300g/0.7lb. About 10cm/4” of my daikon happened to be 300g. It doesn’t matter how thick and long the daikon is.
If your daikon skin is very clean, you don’t even need to peel the skin. Mine was not great so I peeled it.
2. I used a drying net that I use to dry fish in. It is a four-tiered net of about 50cm x 50cm x 55cm / 19 11/16" x 19 11/16" x 21 ⅝". A similar drying net can be found here.
Alternatively, you can use a flyscreen, or a large laundry washing net.
3. If the length of your daikon isn’t close to multiple of 5cm/2”, it is not ideal, but you can make the longer matchsticks.
You can also cut the daikon into different shapes, e.g. cut the daikon into circles then quarters. But the thickness should be about 5mm/3/16".
4. You don’t need to be perfect in separating each daikon piece, but if they are stuck together the drying time will be prolonged.
5. The best place to dry the daikon pieces is in the direct sun with a gentle breeze. But no breeze is OK. Even if it's a cloudy day I put the daikon out.
If it's raining, keep the daikon inside the house.
6. It does not become very crispy to easily break. It is marginally soft but very light.
When fully dried, my Kiriboshi Daikon weighed about 30g/1.1oz, which is just right to make 2 servings as salad. Depending on how much water your daikon had, the weight of the Kiriboshi Daikon will vary slightly.
7. Rehydrate Kiriboshi Daikon when using them. For more details on how to use them in cooking, refer to the recipe Simmered Kiriboshi Daikon (Dried Shredded Daikon).